Your Ultimate New Construction Home Inspection Checklist for North Texas
- scott shipp
- Dec 27, 2025
- 19 min read
Building a new home in Granbury, Weatherford, or anywhere in North Texas is an exciting journey. From the first pour of the foundation to the final coat of paint, every detail contributes to your dream. But how do you ensure the quality you were promised is the quality you receive? The answer lies in methodical, well-timed inspections.
A common misconception is that a new home is a perfect home. However, even the most reputable builders can miss details amidst the complexity of a large project. Factors unique to our region, like the shifting clay soils in Glen Rose and the intense summer heat, can impact a build's integrity. This is where a comprehensive new construction home inspection checklist becomes your most valuable tool.
This isn't about mistrusting your builder; it's about partnering with them to verify that every component meets the highest standards. A proactive approach protects your investment and ensures your home is sound for decades to come. This guide breaks down the critical checkpoints for every major phase, from the pre-drywall inspection when the bones of the house are still visible to the final walkthrough where finishes are scrutinized. We'll equip you with the practical knowledge to identify potential red flags and advocate for your family's biggest asset.
1. Foundation and Structural Integrity
The foundation is the most crucial element of your new home, and its inspection is the first major checkpoint in your new construction home inspection checklist. This stage examines the concrete slab, footings, and structural framing to ensure they can support the home for decades. A proper inspection verifies that the structural skeleton meets all engineering specifications—a vital step in North Texas where our expansive clay soils can cause significant foundation movement.
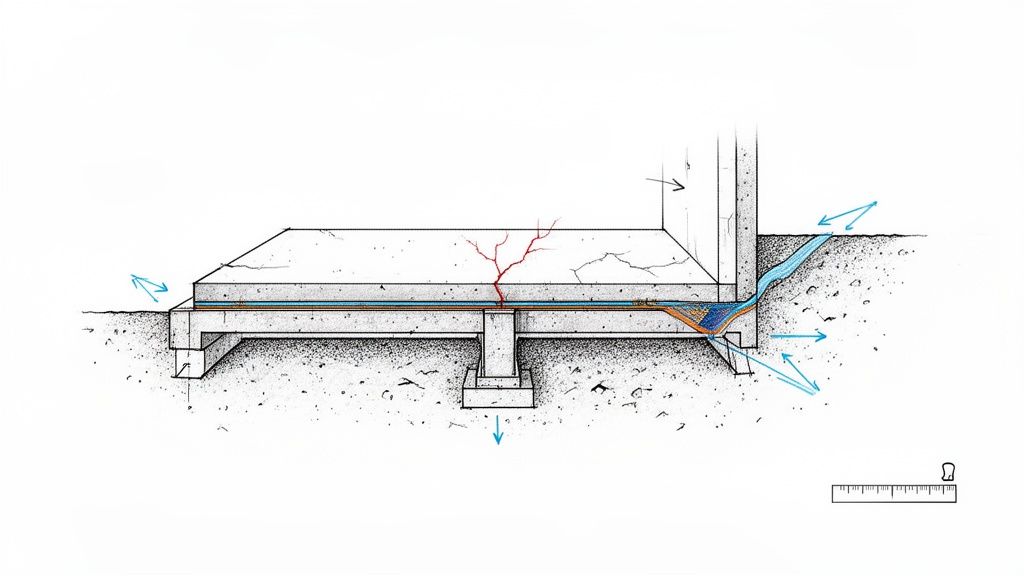
This inspection typically occurs during the pre-drywall phase, but critical checks must happen even before the concrete is poured. A skilled inspector will look for signs of improper preparation that could lead to future problems, like foundation pours done in freezing or excessively hot weather, which can compromise the concrete's strength. They will also verify that waterproofing membranes and vapor barriers are correctly installed. For rural properties on acreage around Weatherford or Granbury, the inspector must pay special attention to site grading and drainage plans to prevent water from pooling against the foundation. A common mistake we see is grading that looks fine on a dry day but turns into a moat during a heavy Texas rain.
Common Foundation Red Flags in North Texas
Expansive Soil Cracks: Hairline cracks are common, but larger, systematic cracks can signal settlement issues related to the clay soil prevalent in areas like Glen Rose.
Improper Drainage: Water pooling near the foundation is a major red flag, indicating the grade slopes toward the house instead of away from it.
Rebar and Tension Cable Issues: The inspector should verify that steel reinforcement (rebar) or post-tension cables are correctly placed and not exposed or too close to the surface before the concrete is poured.
Actionable Inspection Tips
Timing is Key: Schedule this inspection before the builder pours the concrete and again before they install the drywall. This allows for verification of plumbing, rebar, and beam placement before they are permanently covered.
Document Everything: Take high-resolution photos and videos of any cracks, water intrusion, or other concerns. This documentation is invaluable for warranty claims.
Review the Geotechnical Report: For custom builds, ask to see the soil engineering report. Verify that the foundation's design, including the number and depth of piers, specifically addresses the conditions of your lot. Building a strong, sustainable foundation is a cornerstone of a well-built home. You can learn more about the principles behind durable construction in our guide to built-green custom homes in North Texas.
2. Framing and Structural Components
Once the foundation is set, the home’s skeleton takes shape. This makes framing the next critical checkpoint in your new construction home inspection checklist. This phase inspects the wood or steel structure, including wall studs, floor joists, roof trusses, and support beams. A thorough framing inspection ensures the home is structurally sound, square, and built according to the approved architectural plans—essential for withstanding North Texas weather events.
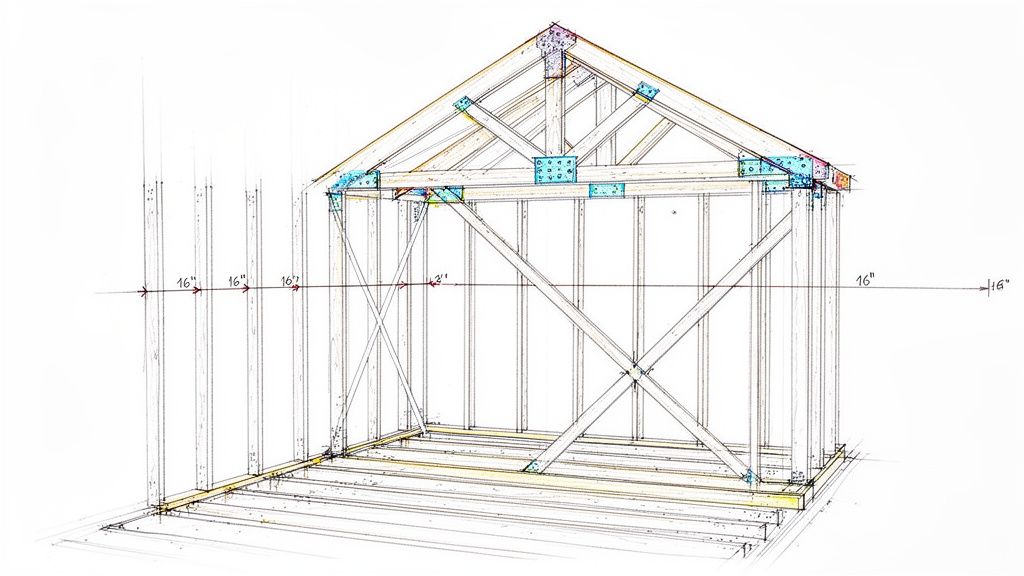
This inspection must happen during the pre-drywall phase, after the framing is complete but before insulation and drywall are installed. An inspector will verify that load-bearing walls are correctly supported and that all connections, from joist hangers to anchor bolts, are properly fastened. They will also look for damaged or warped lumber, which can compromise structural integrity. For custom homes in areas like Aledo or Weatherford with features like vaulted ceilings or large open-concept spaces, verifying that headers and beams are sized and installed correctly is non-negotiable. For example, an undersized header over a wide garage door opening might pass an initial glance but could sag over time, causing cracks and operational issues.
Common Framing Red Flags in North Texas
Improper Nailing Patterns: Missing, over-driven, or incorrectly spaced nails on sheathing and structural connectors can significantly weaken the frame's ability to resist high winds.
Modified Trusses or Joists: Any cuts, notches, or holes made in engineered trusses or I-joists to run plumbing or wiring without an engineer's approval can lead to structural failure.
Out-of-Plumb Walls: Walls that are not perfectly vertical (plumb) can cause major issues with drywall, cabinet installation, and trim work down the line.
Actionable Inspection Tips
Timing is Key: Schedule your framing inspection just before the builder is scheduled to install insulation. This provides a clear, unobstructed view of the entire structural system.
Document Everything: Take detailed photos of all framing components, paying special attention to structural connections, joist hangers, and any areas where lumber has been cut or drilled.
Review the Blueprints: Bring a copy of your architectural and structural plans to the inspection. Your inspector can verify that the framer followed the plans exactly, confirming that beam sizes, stud spacing, and header dimensions match the specifications.
3. Electrical System and Panel Installation
A safe and reliable electrical system is the lifeblood of a modern home, making it a non-negotiable part of your new construction home inspection checklist. This inspection verifies that the main panel, circuits, wiring, and outlet installation meet the National Electrical Code (NEC) and all local requirements. In a custom home, where plans might include high-draw appliances for a gourmet kitchen or dedicated workshop circuits for a retiree's hobby shop, ensuring the system can handle the load from day one is essential.
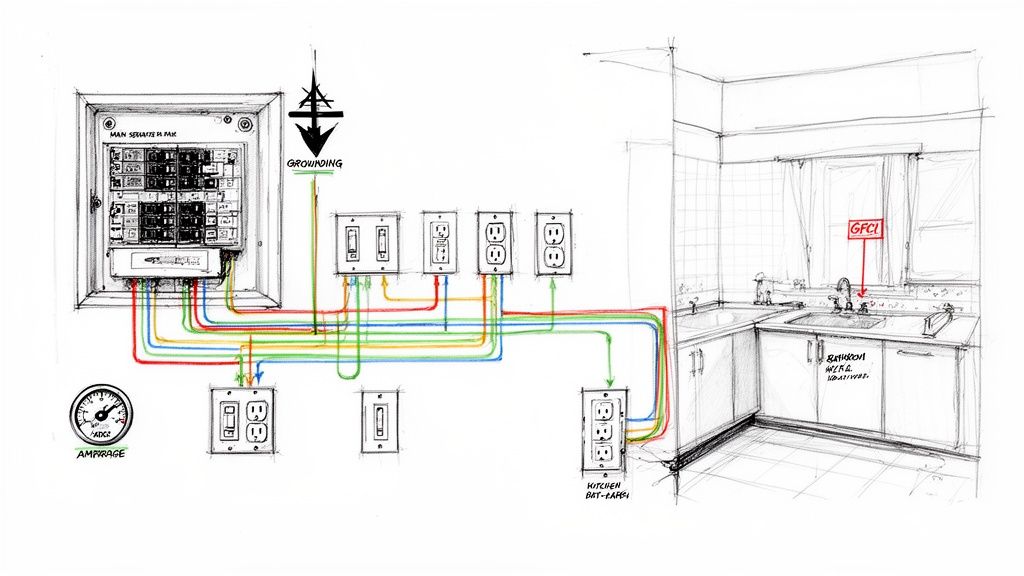
This inspection is best performed during the pre-drywall or "rough-in" phase when all wiring is still exposed. A qualified inspector will confirm the wire gauges are correct for their designated circuits, check for proper grounding, and ensure the main service panel has sufficient capacity. For custom builds in rural areas around Weatherford or Granbury, the inspector will also verify that the service entrance from the utility provider is correctly installed and protected from the elements. This early check prevents costly and difficult repairs after the walls are closed up. A typical inspection costs between $300 and $500 and is worth every penny to avoid future hazards.
Common Electrical Red Flags in North Texas
Improper GFCI/AFCI Protection: Missing or incorrectly wired Ground Fault Circuit Interrupter (GFCI) outlets in kitchens, baths, and outdoor areas is a common and serious safety hazard. Arc Fault Circuit Interrupter (AFCI) protection is also required in most living areas.
Overcrowded Electrical Panel: The main panel should have clearly labeled breakers and spare slots for future additions, like a pool pump or an electric vehicle charger. A maxed-out panel on a brand-new home is a significant oversight.
Unprotected Wiring: Wires running through studs should be protected by metal plates to prevent accidental puncture from drywall screws. Exposed wiring in attics or crawl spaces must be properly secured and shielded.
Actionable Inspection Tips
Verify Circuit Labels: Insist that every breaker in the electrical panel is clearly and accurately labeled before your final walkthrough. This is a simple step that saves immense frustration later.
Confirm Dedicated Circuits: Ensure major appliances like your oven, HVAC unit, and microwave have their own dedicated circuits to prevent overloads and tripped breakers.
Check Outlet and Switch Placement: Walk through the home and physically test outlets and switches. Make sure their placement is logical and aligns with your building plans, especially for custom features like kitchen islands or outdoor entertainment centers.
4. Plumbing Rough-In and Water Supply
Before the drywall goes up, your home's circulatory system of pipes and drains is put on display, making this a critical part of your new construction home inspection checklist. This inspection focuses on the "rough-in" stage, where all water supply lines and drain-waste-vent (DWV) piping are installed but not yet connected to fixtures. A thorough check ensures everything is correctly sized, properly sloped for drainage, and securely fastened to prevent leaks and future failures.
This pre-drywall inspection is non-negotiable, as it’s the only time to see the entire system. Your inspector will verify that supply lines are protected from potential puncture by drywall screws and that pipes in exterior walls, especially common in homes around Granbury, are adequately insulated against freezing temperatures. They will also confirm that the builder has installed necessary nail plates to protect pipes and that all connections are solid, from a complex master bathroom with multiple sinks to a simple outdoor kitchen hookup.
Common Plumbing Red Flags in North Texas
Improper Drain Slope: Drain lines must have a specific downward slope (typically ¼ inch per foot) to function correctly. Pipes that are too flat or too steep can lead to clogs and sewer gas issues.
Stressed or Kinked PEX Lines: Modern PEX tubing is flexible, but sharp bends or kinks can restrict water flow and create weak points that may fail over time.
Unprotected Pipe Penetrations: Pipes passing through studs and joists must be protected by metal plates. Without them, a future nail or screw could easily cause a costly, hidden leak.
Actionable Inspection Tips
Request a Pressure Test: Before the walls are closed, ask the builder to perform a water pressure test on the supply lines. This involves pressurizing the system with air or water to reveal any leaks at joints or fittings.
Photograph Everything: Take detailed photos of all plumbing within the walls, paying special attention to junctions and fixture locations. This documentation is invaluable if you ever need to locate a line for a future remodel or repair.
Verify Septic and Well Tie-Ins: For rural properties on acreage in Weatherford or Glen Rose, ensure that the septic and well system connections are correctly designed, permitted, and installed according to local health codes before they are buried.
5. HVAC System Installation and Ductwork
Your HVAC system is the heart of your home's comfort, and a proper inspection is a non-negotiable part of your new construction home inspection checklist, especially in North Texas where summer heat is relentless. This inspection verifies that the heating and cooling units, ductwork, and thermostats are installed correctly to ensure efficient and consistent climate control. A thorough check confirms the system is properly sized for your home's unique layout—a critical factor for custom homes in places like Weatherford or Granbury that often feature vaulted ceilings and large, west-facing windows.
This inspection should ideally occur during the pre-drywall phase while the ductwork and air handlers are still exposed. Your inspector will examine the quality of the installation, looking for kinks, poor seals, or inadequate support in the duct lines that could restrict airflow and drive up energy bills. They will also verify that the outdoor condenser unit is placed on a stable, level pad with sufficient clearance for maintenance and airflow, a simple detail that is often overlooked.
Common HVAC Red Flags in North Texas
Improperly Sized Unit: An undersized unit will struggle to cool your home during a brutal Texas summer, while an oversized one will cycle on and off too frequently, failing to properly dehumidify the air.
Leaky or Uninsulated Ductwork: Gaps in duct seams or missing insulation, especially in unconditioned attics, can lead to significant energy loss and hot spots throughout the home.
Poor Thermostat Placement: Placing a thermostat in direct sunlight, near an exterior door, or in a kitchen can cause false readings and inefficient system operation.
Actionable Inspection Tips
Request the Manual J Calculation: Ask your builder for the Manual J load calculation. This engineering report proves the HVAC system's size (tonnage) was specifically chosen based on your home's square footage, window placement, insulation values, and local climate data.
Inspect Before Insulation: Schedule a pre-drywall inspection to have your third-party inspector walk the attic and crawlspaces. They can verify ductwork is sealed with mastic, properly suspended, and not crushed or kinked before it's buried in insulation.
Verify Return Air Vents: Ensure there are enough return air grilles and that they are appropriately sized and located to promote balanced air circulation, preventing rooms from feeling stuffy. For more details on system efficiency, explore our guide on how to insulate HVAC ducts in North Texas for comfort and savings.
6. Insulation and Vapor Barriers
Proper insulation and vapor barrier installation are critical for your home’s energy efficiency, making them a key part of any new construction home inspection checklist. This stage focuses on verifying that the thermal envelope is complete and properly sealed against air and moisture intrusion. An effective inspection ensures your home will be comfortable, have lower utility bills, and be protected from moisture-related issues like mold, which is especially important during humid North Texas summers.
This inspection must happen during the pre-drywall phase, after mechanical systems are roughed in but before the insulation is covered. A meticulous inspector will check that insulation batts are not compressed, which reduces their effectiveness, and that all gaps around windows, doors, and electrical boxes are thoroughly sealed. In North Texas, the inspector will verify that the insulation R-values in walls, floors, and especially the attic meet or exceed local energy codes. For a family building on acreage in Weatherford, this means ensuring the insulation strategy accounts for large window exposures and high ceilings to keep everyone comfortable without breaking the bank on energy bills.
Common Insulation Red Flags in North Texas
Incomplete or Compressed Insulation: Gaps, voids, or insulation stuffed too tightly into wall cavities create thermal bridges where energy is lost, leading to higher bills.
Improper Vapor Barrier Installation: In our mixed-humid climate, vapor barriers must be installed correctly (typically on the interior side) to prevent moisture from getting trapped within wall cavities, a leading cause of mold.
Poor Air Sealing: Unsealed penetrations for wiring, plumbing, and ducts in the attic or crawlspace compromise the home's air tightness and allow conditioned air to escape.
Actionable Inspection Tips
Schedule Pre-Drywall Verification: This is your only chance to visually confirm the quality of the insulation job. Ensure your inspector walks every room, the attic, and any crawlspaces.
Check the R-Value: Ask the builder for the product specifications and confirm the installed insulation’s R-value matches what is required for our climate zone and what was specified in your contract. Common choices here are fiberglass batts or spray foam; both work well, but spray foam typically costs more while offering superior air sealing.
Verify Attic Ventilation: In addition to insulation, proper attic ventilation (e.g., soffit and ridge vents) is crucial in Granbury and surrounding areas to manage heat and moisture buildup. Confirm the ventilation plan is adequate and unobstructed.
7. Drywall Installation and Tape/Finish
Once the “bones” of your home are covered, the quality of the drywall installation dictates the final look of every room. This critical part of your new construction home inspection checklist examines how the drywall sheets are hung, taped, and finished. A proper inspection verifies that seams are invisible, corners are sharp, and surfaces are perfectly smooth, ready for paint. In North Texas, where bright, natural light is a key architectural feature, any imperfections in the drywall finish will be highly visible.
This inspection phase is all about the details that create a polished, high-end interior. A third-party inspector will scrutinize the walls and ceilings under strong, angled lighting to spot any waves, bumps, or depressions in the mudding and taping. They’ll check for proper fastener usage, ensuring screws or nails are set to the right depth without tearing the drywall paper, which can lead to "nail pops" later on as the home settles. For custom homes in communities like Pecan Plantation with complex architectural ceilings or curved walls, this inspection is even more vital.
Common Drywall Red Flags in North Texas
Visible Seams and Tool Marks: Obvious joints, sanding swirls, or trowel marks indicate a rushed or poor-quality finish job. These flaws become more apparent after the first coat of primer is applied.
Improper Fastener Depth: Screws driven too deep break the paper and lose their holding power, while those not driven deep enough create bumps on the wall surface.
Poorly Finished Corners: Inside and outside corners should be crisp and straight. Bulging or cracked corner bead is a clear sign of improper installation.
Actionable Inspection Tips
Use Angled Lighting: Perform your own walkthrough with a bright work light held close to the walls and ceilings. Shine it at a sharp angle to reveal shadows that highlight imperfections you wouldn't normally see.
Check Before and After Primer: Inspect the raw drywall finish before the builder applies primer. A second check after priming is crucial, as the uniform color will make any remaining flaws stand out.
Document with Photos: Take close-up pictures of any problem areas like visible tape lines, nail pops, or uneven textures. This visual evidence is essential when creating a punch list for the builder to correct before final painting.
8. Windows, Doors, and Exterior Openings
Properly sealed windows, doors, and other exterior openings are your home’s primary defense against the harsh North Texas weather. This part of your new construction home inspection checklist focuses on verifying that every opening is properly installed, flashed, and sealed to prevent air leaks and water intrusion. A thorough inspection ensures that these elements are not just aesthetically pleasing but are functional, secure, and energy-efficient.
This inspection should happen at the pre-drywall stage, before exterior cladding like brick or siding is installed. This allows the inspector to see the "bones" of the installation, including the flashing and how the units are secured to the framing. In areas like Weatherford and Aledo, where high winds are common, ensuring windows and doors are correctly fastened is critical. The inspector will verify that each unit is plumb, level, and operates smoothly. For materials, vinyl windows are a cost-effective choice, while fiberglass or wood-clad options offer better durability and aesthetics at a higher price point.
Common Window and Door Red Flags in North Texas
Improper or Missing Flashing: The inspector will check for correctly installed flashing tape around all window and door frames. Gaps or reverse laps are major red flags that will lead to water damage inside the walls.
Poor Sealing: Inadequate sealant or foam insulation around the frames creates drafts, driving up energy bills. This is especially important for custom homes in Granbury designed with large, expansive glass features.
Operational Flaws: Doors that stick, windows that are difficult to open or close, or locks that don't engage properly indicate a poor installation that needs immediate correction.
Actionable Inspection Tips
Inspect Before Cladding: The most critical check is before the exterior finish is applied. Verify that the builder has used proper flashing techniques that integrate with the home’s weather-resistant barrier.
Test Every Unit: Open and close every single window and door. Lock and unlock them. Ensure French doors align perfectly and that sliding doors glide smoothly without catching.
Document with Photos: Take close-up photos of the flashing, sealant application, and how each unit is shimmed and fastened to the frame. This evidence is crucial if a warranty claim is needed later.
9. Roofing System and Weather-Tightness
A home’s primary defense against the punishing hail and high winds of North Texas is its roofing system. This part of your new construction home inspection checklist goes beyond just checking shingles; it’s a comprehensive review of the entire system, from the roof deck and underlayment to the flashing, ventilation, and gutters. A proper inspection ensures the roof is meticulously integrated to protect your home’s structural integrity.
This inspection should ideally happen during and after the installation process. A professional inspector will verify that the installation meets or exceeds both local building codes and the manufacturer’s specifications—especially critical for custom homes in places like Weatherford with complex, multi-gabled rooflines. They will examine the nail patterns on shingles, the sealing around vents and pipes, and the proper installation of flashing in valleys and along walls where leaks are most likely to occur. For example, a common issue on a recent remodel in Granbury was improperly sealed flashing around a new skylight, which was only caught by an inspector before it could cause interior damage.
Common Roofing Red Flags in North Texas
Improper Shingle Nailing: Shingles that are under-driven, over-driven, or have nails placed in the wrong location can be easily ripped off during a strong North Texas storm.
Poorly Installed Flashing: Missing or incorrectly installed flashing around chimneys, skylights, and where roof planes meet is a primary cause of water intrusion.
Inadequate Attic Ventilation: A poorly ventilated attic in the Texas heat can lead to moisture buildup, mold growth, and premature aging of the roof structure and shingles.
Actionable Inspection Tips
Verify Material and Method: Before installation, confirm the builder is using the specified materials and that the crew understands the manufacturer's required installation method. For instance, impact-resistant (Class 4) shingles cost more but can earn you a significant discount on your homeowner's insurance in hail-prone areas.
Inspect Before It's Covered: Check the roof decking for any damaged panels and ensure the synthetic underlayment or felt is laid flat without tears before the shingles are installed.
Check Penetrations and Valleys: Pay close attention to all roof penetrations (vents, pipes) and valleys. Ensure they are properly sealed with high-quality flashing and sealants to prevent leaks.
10. Final Walk-Through and Code Compliance Verification
The final walk-through is the culminating step in your new construction home inspection checklist, representing the last opportunity to identify and address issues before you take possession. This is a comprehensive review where you, your builder, and your inspector confirm that all work is complete, all previous punch list items have been corrected, and the home meets all local building codes and your contractual expectations. This inspection covers everything from the final exterior grade to the flawless operation of every single light switch and faucet.
This is your chance to meticulously test the home as you will live in it. The process is more than just a quick look; it's a systematic verification that ensures the home is truly move-in ready. For custom builds in areas like Granbury or on rural acreage, this is also when you confirm that all specific design elements, from custom cabinetry to specialized outdoor living features, have been executed to your exact specifications. Every detail, no matter how small, should be documented and addressed before closing.
Common Final Walk-Through Red Flags in North Texas
Cosmetic Finish Flaws: Look for paint drips or splatters, scratches on flooring or countertops, and improperly installed trim or hardware. These small issues are much harder to get fixed after you've moved in.
System Malfunctions: Inoperable appliances, dead electrical outlets, or HVAC systems that don't cool properly are critical findings. Test every system thoroughly.
Improper Site Grading: Check that the soil slopes away from the foundation on all sides to prevent water intrusion, a crucial detail given North Texas's heavy rains.
Actionable Inspection Tips
Create a Detailed Punch List: Use blue painter's tape to mark every flaw you find. Take a corresponding photo of each marked item and compile them into a detailed "punch list" for the builder.
Verify All Paperwork: Confirm that the builder has received the Certificate of Occupancy (CO) from the local municipality. This document certifies the home is safe and compliant with all building codes.
Test Everything: Don’t be shy. Turn on every light, run every faucet (checking for hot water and pressure), flush every toilet, open every window and door, and test every appliance. Understanding this final stage is key; you can see how it fits into the broader schedule in our guide to the North Texas house construction timeline.
New Construction Inspection — 10-Point Comparison
Component | Implementation complexity | Resource requirements | Expected outcomes | Ideal use cases | Key advantages |
|---|---|---|---|---|---|
Foundation and Structural Integrity | High — requires geotechnical and structural evaluation | Structural engineer, specialized inspector, soil report, moisture and leveling tools | Stable load-bearing foundation, code compliance, early defect detection | New builds on clay soils, custom homes on acreage, early-stage corrections | Prevents major structural failures, preserves long-term value |
Framing and Structural Components | Medium–High — precision and load calculations required | Framing crew, engineered plans, bracing, laser levels, fasteners | Correct load paths, plumb framing, ready for MEP trades | Open plans, vaulted ceilings, structural remodels or additions | Ensures structural safety and design integrity before finishes |
Electrical System and Panel Installation | Medium — code-critical and safety-focused | Licensed electrician, panels/wiring/breakers, testing equipment | Safe service with proper capacity, NEC compliance, labeled circuits | Homes with heavy appliances, outdoor/entertainment power needs, custom systems | Prevents fire/shock hazards and ensures adequate power capacity |
Plumbing Rough-In and Water Supply | Medium — requires accurate slopes and leak testing | Licensed plumber, PEX/copper/ DWV materials, pressure test gear, valves | Leak-free supply/drainage, correct fixture locations, proper venting | Multi-bath homes, kitchen islands, pools/outdoor plumbing | Prevents concealed leaks and costly post-finish repairs |
HVAC System Installation and Ductwork | Medium — requires load calculations and airflow balancing | HVAC contractor, Manual J/S, ducting, seals, insulation, support hardware | Efficient heating/cooling, balanced airflow, correct tonnage | Large or vaulted spaces, additions, energy-efficient designs | Improves comfort and reduces utility costs; prevents hot/cold spots |
Insulation and Vapor Barriers | Low–Medium — attention to details and R-values | Insulation materials, vapor barrier, installation crew, inspection tools | Improved thermal performance, moisture control, energy code compliance | Climate-sensitive builds, attics/basements, energy-focused homes | Lowers energy bills and protects against moisture-related damage |
Drywall Installation and Tape/Finish | Low–Medium — skill-dependent finishing work | Drywall installers, fasteners, joint compound, sanding tools, lighting | Smooth, paint-ready surfaces and concealed structural finishes | Final interior finishing, high-visibility rooms, custom trim areas | Ensures professional appearance and prepares surfaces for final finishes |
Windows, Doors, and Exterior Openings | Medium — flashing and sealing are critical | Window/door installers, flashing, sealants, shims, fastening hardware | Weather-tight openings, proper operation, improved thermal sealing | Homes with extensive glazing, French doors to outdoor living, remodels | Prevents water intrusion and improves energy efficiency/security |
Roofing System and Weather-Tightness | Medium–High — details affect long-term performance | Roofing contractor, underlayment, shingles/tiles, flashing, gutters, ventilation | Protected envelope, proper drainage/ventilation, extended roof life | Complex rooflines, high-exposure climates, new installations | Protects structure from water damage and extends roof longevity |
Final Walk-Through and Code Compliance Verification | Medium — comprehensive review and coordination | Building inspector, contractors, punch-list documentation, test tools | Occupancy readiness, corrected deficiencies, final permit compliance | Project completion, homeowner handover, warranty commencement | Confirms safety/code compliance and documents completed condition |
Building with Confidence in North Texas
Navigating the new construction process can feel overwhelming, but armed with this inspection checklist, you are now equipped to be an active and informed partner in building your dream home. This guide isn't just a list; it's a framework for proactive quality control, designed to protect your investment and ensure your home is built to the highest standards.
The journey from a bare lot in Weatherford to a finished home in Granbury is a sequence of critical stages. As we've detailed, the most impactful inspections happen long before the final walkthrough. Catching a framing issue during the pre-drywall phase is far simpler and less costly than discovering it after the paint has dried. Similarly, verifying proper plumbing and electrical rough-ins before they are concealed behind walls prevents future headaches that could range from minor annoyances to significant safety hazards.
Key Takeaways for Your North Texas Build
Your diligence is the most valuable tool in the construction process. To truly build with confidence, remember these core principles:
Inspect Early and Often: Don't wait for the final walkthrough. The pre-drywall inspection is non-negotiable and provides the last clear view of your home's structural and mechanical "bones."
Documentation is Your Ally: Keep a meticulous record. Take photos, date your notes, and save all email communications with your builder. This "punch list" of documented items is your best resource for ensuring every concern is addressed.
Hire a Professional Third-Party Inspector: Your builder has their own quality control, and the city inspector checks for code minimums. An independent inspector works solely for you, bringing an unbiased, expert eye to identify issues that others might miss.
Understand Regional Nuances: Here in North Texas, we contend with expansive clay soils and extreme weather. This makes foundation integrity, proper drainage, robust roofing, and a high-performance HVAC system especially critical.
Your Action Plan for a Successful Home Build
Transforming this knowledge into action is what ensures a quality outcome. First, if you haven't already, begin researching and interviewing qualified, independent home inspectors who specialize in new construction and are familiar with building practices in areas like Glen Rose and Stephenville.
Next, review your builder's contract and timeline. Mark your calendar with tentative dates for key milestones, especially the pre-pour foundation inspection and the critical pre-drywall phase. Share this checklist with your chosen inspector so they understand your priorities. Building a new home is one of the most significant investments you will ever make. By approaching it with a comprehensive inspection checklist, you are actively participating in the creation of a safe, durable, and beautiful home for your family.
If you’re considering building a custom home in the Granbury area and want a partner who values this level of detail and transparency, we'd be happy to discuss your project and share how our process ensures quality from the ground up.
Comments