How to Read a Floor Plan: Your North Texas Homebuilding Guide
- scott shipp
- Jan 9
- 13 min read
A floor plan is the language of your future home. Before you can talk confidently with your builder, you need to be comfortable with the basics. The two most fundamental concepts are scale (how the drawing relates to real-world size) and orientation (how your home will sit on the land). Nail these two, and you’re well on your way.
Your Blueprint to a Better Home: Understanding the Basics
Whether you're planning a custom home in Granbury or remodeling a classic in Weatherford, the floor plan is your single most important document. At first glance, it can look like a jumble of lines and symbols, but it’s a straightforward map once you know what to look for.
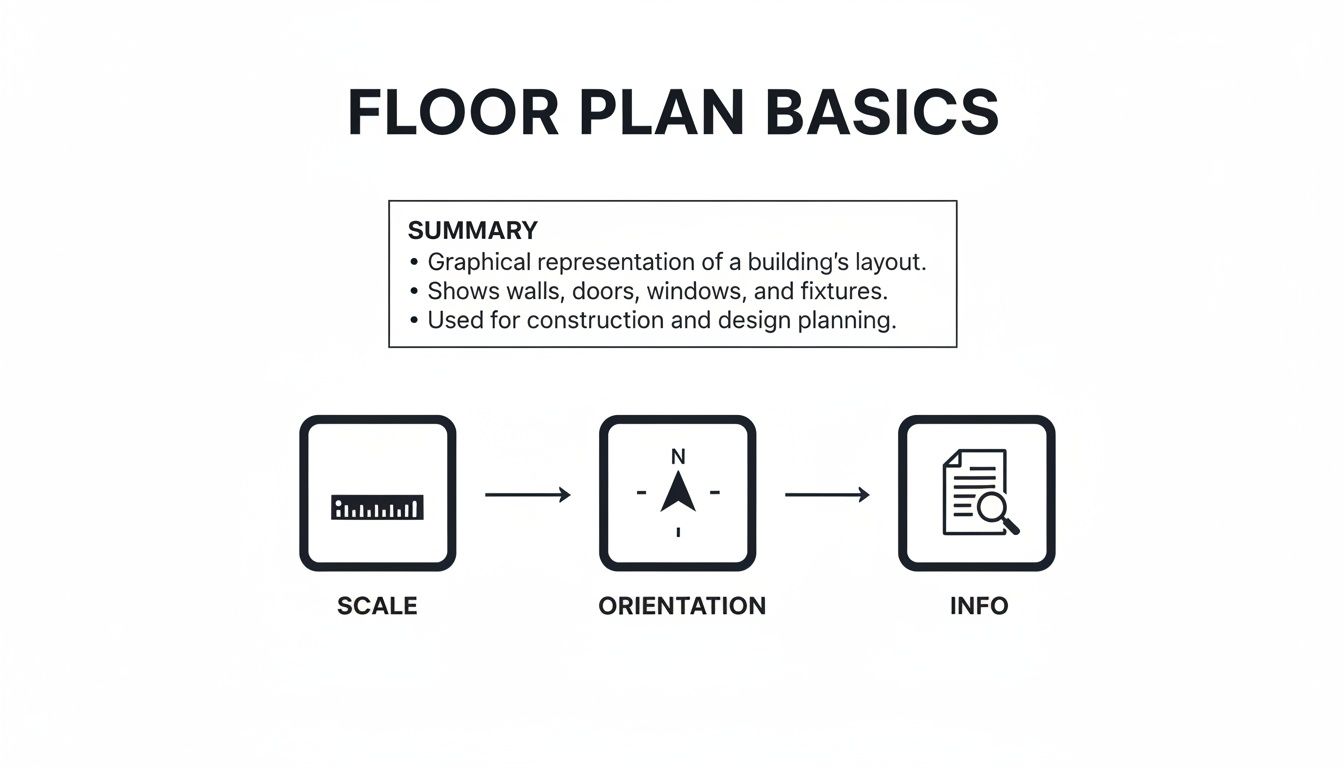
Imagine you've lifted the roof off your house and are looking straight down. That's the perspective of a floor plan. This bird's-eye view is perfect for seeing how rooms connect, judging proportions, and spotting potential issues with flow. The first two things I always look for are the title block and the North arrow.
The Title Block: Tucked away in a corner, this box is the project's ID card. It has the address, the designer’s name, the date of the drawing, and—most importantly—the scale.
The North Arrow: This simple compass symbol shows you which way is North, which is critical for understanding how sunlight will travel through your home. Here in North Texas, knowing where that intense morning and afternoon sun will be makes all the difference in where you place bedrooms versus living areas to keep your home comfortable and energy-efficient.
Grasping the Scale of Your Project
You can't carry around a life-sized drawing of your home, and that’s where scale comes in. It shrinks everything down proportionally to fit on a page. Most residential plans in the U.S. use a scale of 1/4 inch = 1 foot.
This means every quarter-inch you measure on the paper equals one full foot in the real world. This simple ratio is everything when visualizing your space. In fact, over 70% of new-home shoppers say a clear floor plan is vital to their decision, and understanding scale is the key to that clarity. You can learn more about how this impacts your project in our practical guide to building a custom home in North Texas.
Understanding scale helps you compare a 14'x16' primary bedroom to a 10'x10' secondary bedroom. On paper, they might look similar, but in reality, the larger room has 124 more square feet—that's 55% more floor area. This detail is crucial when planning for furniture, especially for retirees who may be downsizing but still have cherished large pieces.
Cracking the Code: A Guide to Floor Plan Symbols and Shorthand
Once you've got your bearings with scale and orientation, the next step is learning the language of the floor plan. Think of it as a map for your future home, filled with a specialized shorthand of symbols and abbreviations. Mastering this visual language transforms a complex drawing into a clear story of your space.
Every line, arc, and symbol has a purpose. Thick, bold lines usually represent the main structural walls, while thinner lines show interior walls. Gaps in a line aren't errors—they are intentional openings for doors and windows. It might seem a little overwhelming at first, but you'll pick up the patterns quickly.
This diagram breaks down the foundational elements—the title block, scale, and orientation—that give you the context you need to start reading the plan.
With those basics down, you're ready to dive into the specific symbols that bring the details of each room to life.
What Do All Those Little Drawings Mean?
Blueprints are dense with symbols and abbreviations. Learning them is the best way to understand how your home will function long before the first wall goes up. A typical residential plan can easily contain 100–300 different symbols for everything from plumbing fixtures to light switches.
For example, a standard door is drawn as a thin rectangle with an arc showing which way it opens—a tiny detail that's hugely important when placing furniture. If a homeowner can identify the 40–60 most common symbols, they can accurately interpret about 90% of a standard floor plan. For a deeper dive, BigRentz.com offers a comprehensive guide to professional blueprint symbols.
Here are a few important symbols you'll see on plans for homes in the Granbury and Weatherford areas:
Doors: That little arc is critical. It shows the swing direction and how much clearance you'll need. A door swinging into a tight bathroom can make it feel instantly cramped. You'll also see symbols for pocket doors, which slide into the wall—a fantastic space-saver for laundry rooms or small bathrooms.
Windows: Different symbols distinguish between fixed windows (which don't open), casement windows (that crank out), and sliding windows. This tells you how you'll get cross-ventilation, a big deal for catching a breeze on a hot North Texas afternoon.
Fixtures & Appliances: Look for outlines that represent your refrigerator (REF), dishwasher (DW), and washer/dryer hookups (W/D). The kitchen symbols are vital for mapping out your "work triangle"—the path between the sink, stove, and fridge.
A Quick Reference to Common Symbols
To help you get started, here is a quick-reference table of the symbols we see most often on residential plans here in North Texas.
Common Floor Plan Symbols at a Glance
Symbol Category | Common Symbols | What They Mean |
|---|---|---|
Doors & Windows | A line with an arc; a rectangle sliding into a wall | Standard swinging door, pocket door, bifold door. |
A break in a wall, often with thin lines inside | Indicates the location and type of window (e.g., fixed, sliding, or casement). | |
Walls & Structure | Thick, solid lines; thinner lines | Exterior or load-bearing walls vs. interior partition walls. |
Kitchen & Bath | Circles, ovals, and rectangles | Sinks, toilets, bathtubs, and showers. Each has a distinct, recognizable shape. |
Appliances | Squares with abbreviations like REF, DW, W/D | Refrigerator, dishwasher, oven range, and washer/dryer locations. |
Electrical & HVAC | Circles with lines or letters; squares with HVAC | Outlets, switches, lighting fixtures (ceiling, wall), and the heating/cooling unit. |
Stairs & Fireplaces | A series of parallel lines; a box with a flue | Shows the direction of the staircase (up/down) and the location of a fireplace or stove. |
This isn't an exhaustive list, but it covers the essentials you'll need to make sense of almost any residential floor plan.
Don't Forget the Abbreviations
Architects use abbreviations to pack in more detail without cluttering the drawing. You'll see things like WIC for a walk-in closet or P for pantry. Others provide vertical information, like AFF (above finished floor), which specifies the height of things like countertops or a showerhead.
I always tell our clients building on properties out near Glen Rose or Tolar to pay close attention to these details. Identifying the symbol for the water heater (WH) or the main electrical panel early on can prevent placing them in a closet right next to a quiet bedroom where the noise would be a nuisance.
Getting comfortable with this visual shorthand gives you the power to ask better questions and make smarter decisions. If you ever see a symbol or abbreviation you don't recognize, just ask. A five-minute conversation with your builder can clear up confusion and ensure the home they build is the one you’ve been dreaming of.
Making the Space Your Own: Dimensions, Flow, and Furniture
This is my favorite part—where a drawing on paper starts to feel like an actual home. Once you understand the symbols and scale, you can picture your life unfolding in the space, from where the sofa will go to how you'll move through the house every day.
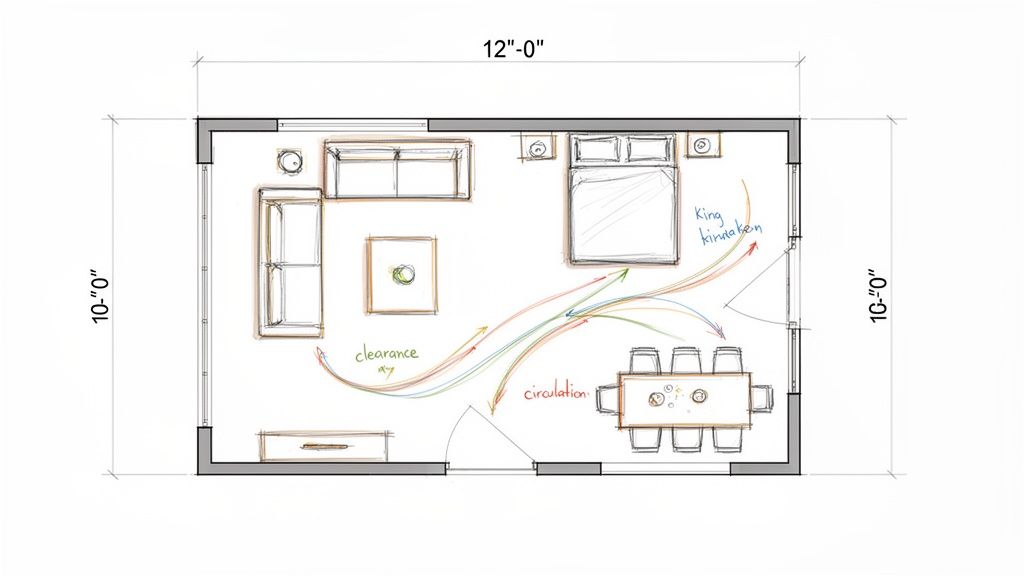
Look for the dimension lines—the thin lines capped with tick marks or arrows. They give you the precise measurements of every space. When you see a family room labeled “12’ x 16’,” you know it’s 12 feet wide by 16 feet long. A 12-foot-wide room in a Stephenville home feels spacious enough for a comfy sofa and chairs, but a room that's only 10 feet wide can feel tight once you get furniture in there.
Tracing Your Daily Paths
A truly great floor plan isn't just a collection of nice rooms; it's about how those rooms connect. We call this traffic flow, and it’s a make-or-break element of good design. Before you commit to a layout, mentally “walk” through it.
Pretend you’re going about your day. Start from the garage and trace your most common routes:
Bringing in groceries: Is it a straight shot from the car to the kitchen pantry, or are you navigating a maze of hallways? For a family, an easy path is a must.
The morning rush: Can multiple people get from bedrooms to bathrooms and out the door without creating a bottleneck in a narrow hall?
Having guests over: Is there a clear path to the powder room, or do visitors have to wander through private family spaces?
This simple visualization exercise is effective at uncovering awkward layouts that look fine on paper but would be frustrating in real life. It’s especially critical for families with young children or for retirees planning for long-term accessibility.
Will Your Furniture Actually Fit?
An empty room on a blueprint can be deceiving. That primary bedroom might look huge until you realize the only wall that fits your king-sized bed also blocks the closet door. You have to test your furniture placement before breaking ground.
Here’s a practical tip: make scale cutouts of your furniture. Measure your sofa, beds, and dining table, then cut them out of paper using the plan’s scale (usually 1/4" = 1'). Now you can physically move the pieces around on the floor plan to see what works.
This hands-on approach immediately reveals potential problems. You’ll know for sure if you have enough room to pull out chairs around the dining table or if that giant sectional will overpower the living room.
If you're building an open-concept home, placing furniture is even more important. We’ve put together a practical guide to decorating an open floor plan with more advice on this. This extra step ensures the home you build functions perfectly for your lifestyle.
Looking Deeper: Structural and Mechanical Details
A great floor plan tells you more than just where the walls go. It gives you a peek at your home's bones—the structure—and its circulatory system, including all the mechanical, electrical, and plumbing essentials. This is how you understand how your house will truly live and breathe.
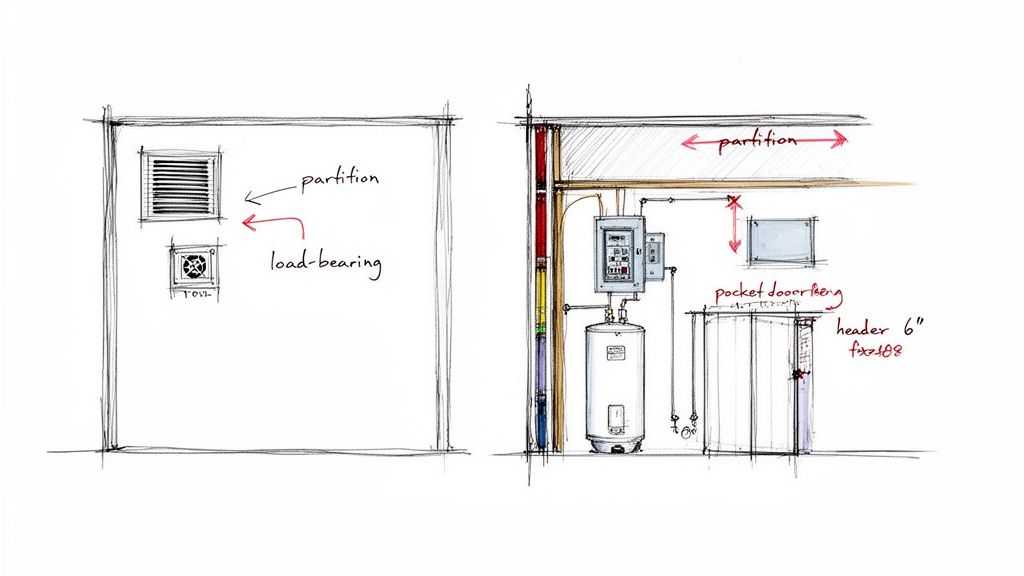
One of the first things to look for is wall thickness. On a plan, not all walls are created equal. Thicker lines almost always represent load-bearing walls—the heavy lifters holding up the second story or the roof. Thinner lines are your standard interior partition walls.
Every now and then, you'll spot an interior wall that's unusually thick. This is a big clue. It’s often a plumbing wall, designed to be deep enough to house the pipes for a kitchen or bathroom.
Spotting the Hidden Features
Beyond the basic walls, keep an eye out for specific notes and symbols that reveal custom touches and critical systems. These are the details that separate a generic house from a thoughtfully designed home.
Here are a few things to watch for:
Ceiling Height Notations: Look for notes like "10' CLG" or symbols that indicate a vaulted or coffered ceiling. In a North Texas home, high ceilings are a game-changer, making a room feel dramatically larger and more open.
Headers Over Openings: Any large doorway or wide pass-through needs a structural beam called a header to carry the load above it. The plan might specify something like "LVL BEAM," which confirms the opening is properly engineered.
Specialty Doors and Built-Ins: You might see a symbol for a pocket door (a rectangle that slides into a thickened wall cavity) or dashed lines showing built-in shelves. These are fantastic space-savers but can affect your budget as they require more complex framing.
Understanding Your Home's Systems
While the full Mechanical, Electrical, and Plumbing (MEP) schematics are separate documents, the main floor plan usually pinpoints the location of key components. Spotting these helps you visualize how the home will function. For instance, the placement of the HVAC unit matters. If it's right next to a bedroom, you might have to live with a constant hum.
I always remind clients building on rural properties near Glen Rose or Stephenville to pinpoint the location of the water heater (WH), electrical panel, and connections for the well and septic. You want that equipment in a utility closet or garage where it's easy to access, not tucked away somewhere that will be a headache for future maintenance.
Learning to read these structural and mechanical notes empowers you to ask smarter questions and avoid frustrating surprises down the road. It’s the final layer of detail that transforms your conversation with a builder from a simple chat into a truly productive collaboration.
Putting It All Together: Your Pre-Construction Game Plan
You’ve cracked the code. You can now look at a set of blueprints and see your future home taking shape. Before you give that final sign-off, sitting down with your builder for a room-by-room review is the single most important thing you can do. It’s your best defense against costly change orders and post-move-in regrets.
This isn't about redesigning the house; it’s about dialing in the details that turn a structure into your home. This is your moment to ask all the "what if" and "how will" questions, ensuring every switch, outlet, and doorway works for your family's life.
Asking the Right Questions, Room by Room
Imagine walking through the finished house with your builder, but doing it on paper first. This conversation is far cheaper than discovering you need to move a wall after the drywall is up. A change order on-site can easily cost 10 to 15 times more than erasing and redrawing a line on the plan.
Here are the kinds of practical things you should be thinking about:
Kitchen: Is the classic "work triangle" between the sink, stove, and fridge actually efficient for how you cook? Where will you plug in the coffee maker or stash the air fryer? Is there enough landing space on both sides of the cooktop for hot pans?
Living Areas: Where is the TV going? Seriously. Are the outlets and cable hookups in the right spot? Picture your furniture in the space—will your dream sectional block the main walkway to the patio?
Bedrooms: Check the door swing. Does it bang into the closet door or prevent you from putting a nightstand where you want it? Find the best wall for your bed—ideally not directly under a window where light and drafts can be an issue.
Bathrooms: Will the shower door have enough clearance to open fully without hitting the toilet? Where will you hang wet towels? Is there a spot for extra toilet paper?
Thinking Like a Texan
Building a home in Granbury, Weatherford, or anywhere in North Texas means planning for our unique lifestyle and climate. Your floor plan needs to account for everything from scorching summers to sudden spring storms.
Here's a pro tip: Pay close attention to the orientation of your outdoor living spaces. A gorgeous covered patio is useless on a hot summer afternoon if it faces due west and gets blasted by the sun. Ensure your design provides shade when you'll actually want to use the space.
Don't forget these other regional details:
Storm Safety: If a storm shelter or safe room is part of your plan, is it easy to get to from the main living areas?
Holiday Lights: Are there exterior outlets planned in the soffits? It makes putting up Christmas lights a thousand times easier.
Mudroom/Entry: After a classic Texas downpour, where will the muddy boots and wet jackets go? A designated drop zone with durable flooring like tile or stained concrete can handle the mess.
This process is your final chance to sweat the small stuff. A detailed review now is just as critical as the final walkthrough, a point we cover in our ultimate new construction home inspection checklist for North Texas. It ensures every detail is nailed down before it’s set in concrete—literally.
| Floor Plan Review Questions for Your Builder || :--- | :--- || Area of Focus | Key Questions to Ask || Overall Flow & Layout | How will we move from room to room? Are there any potential bottlenecks? || | Where will guests naturally gather? Is the space designed for it? || | Does the layout provide enough privacy for bedrooms and bathrooms? || Kitchen | Can we walk through the work triangle? Is it functional for more than one person? || | Is there enough counter space where I need it most (next to the stove/oven)? || Electrical & Lighting | Where will light switches be located? Are they in intuitive spots? || | Have we planned for enough outlets in each room, especially for electronics? || Windows & Doors | Do any door swings conflict with each other or with furniture placement? || | Is there a good balance of natural light and privacy? || Storage | Have we maximized closet space? Are there any "dead" areas we can use? || | Where will we store bulky items like holiday decorations or cleaning supplies? || Outdoor Living | Will the patio/deck get morning or afternoon sun? Does that fit our lifestyle? || | Is there a convenient location for the grill, with easy access to the kitchen? |
Taking the time to ask these questions ensures you and your builder are perfectly aligned. It’s the last, most crucial step in turning a blueprint into a home you'll love for years to come.
Have Questions About Your Floor Plan? You're Not Alone.
After you've got the basics down, you'll probably still have questions. That’s completely normal. Here in Granbury, we hear the same great questions from nearly every client. Let's tackle some of the most common ones so you can walk into your next meeting with total confidence.
One of the biggest hurdles is getting your brain to see a 3D home on a 2D piece of paper. If you’re finding it tricky to feel the space, you're in good company.
Here’s a fantastic, low-tech trick: grab a roll of painter's tape. Go mark out the exact dimensions of a critical room—like your kitchen or primary bedroom—on your driveway or in a large, open room. Walking around "inside" those lines gives you a gut feeling for the space that a drawing can't match.
This simple exercise can be a real eye-opener. You’ll know instantly if a walkway feels cramped or if that great room is as grand as you'd hoped. It’s the best way to bridge the gap between paper and reality.
What’s the Real Square Footage?
Another thing that trips people up is how square footage is calculated. There are a couple of key numbers on any plan, and they mean very different things.
Heated Square Footage: This is the number that really counts for appraisals and official listings. It's all the livable, climate-controlled space in your home—bedrooms, kitchen, living areas, and even finished basements. It specifically excludes garages, covered patios, and unfinished attics.
Total Square Footage (or "Under Roof"): This is the bigger number. It includes everything under the home's roofline—that means all the heated space plus the garage, porches, and any covered patios. When you're building in places like Weatherford or Glen Rose, that outdoor living area is a massive part of your home's appeal, but it's important to know it isn't part of the "livable" square footage.
Knowing the difference helps you make apples-to-apples comparisons between home plans and ensures you and your builder are talking about the same thing.
The True Cost of "Just Moving a Wall"
We hear it all the time: "Can we just push this wall out a foot?" It sounds simple, but in construction, even tiny changes can have surprisingly large price tags.
That seemingly small adjustment can set off a chain reaction. Moving an interior wall might mean you also have to:
Reroute HVAC: All that ductwork has to be moved.
Relocate Electrical: Outlets, switches, and fixtures all need to be rewired.
Move Plumbing: If it's a "wet wall" with pipes, the job just got far more complex and costly.
Re-engineer the Structure: If that wall is load-bearing, it's supporting the weight of the floor above or the roof. Moving it requires new headers and support systems, a change that can easily run from $1,500 to over $10,000, depending on what's involved.
The takeaway? Make your changes on paper, where they're free. Once ground is broken, every little tweak hits your budget. Getting every detail locked in before construction starts is the single best way to keep your project on track and on budget.
When you're ready to start a conversation about your own custom home in North Texas, our team is here to walk you through the process, one detail at a time. Learn more about building with us.
Comments