Insulate HVAC Ducts: A North Texas Guide to Comfort and Savings
- scott shipp
- Nov 30, 2025
- 13 min read
That brutal North Texas heat means your air conditioner is putting in some serious overtime. But what if a huge chunk of that cool air is escaping before it ever cools you down? For a surprising number of homeowners in Granbury and Weatherford, that’s exactly what’s happening through uninsulated ductwork.
Uninsulated ducts are often the biggest energy vampires in a home, responsible for losing up to 30% of the conditioned air you’re paying for as it travels through a scorching hot attic.
Why Bother Insulating HVAC Ducts in North Texas?
Think about where your ductwork runs. If it’s in a blistering Granbury attic or a humid crawlspace in Glen Rose, it's surrounded by extreme temperatures. On a summer afternoon, your attic can easily hit 140°F. When the 55-degree air from your AC travels through ducts in that environment, it heats up fast.
The result? Your air conditioner has to work much harder and run longer just to get your living room to the temperature you set on the thermostat. You’re literally paying to cool your attic instead of your home.
It's About More Than Just Your Electric Bill
We see this all the time, especially in older homes around the North Texas area: the upstairs is an oven, but the downstairs is an icebox. Nine times out of ten, the problem isn't the AC unit itself—it's the ductwork. Leaky, uninsulated ducts lose so much of their cool on the long journey to the second floor that those rooms never stand a chance.
Sealing and insulating those ducts is the real solution. It ensures the air that leaves the unit is the same temperature as the air that comes out of your vents, creating even comfort throughout the house.
For many families we work with, insulating ducts isn't just about saving a few bucks. It's about finally making the whole house comfortable for everyone, from the master bedroom to the kids' rooms upstairs, all year long.
This isn't just a local trend. As building codes get stricter and people focus more on efficiency, the demand for better HVAC insulation is booming. You can learn more about how extreme climates like ours are pushing the need for better duct insulation in new North Texas homes and remodels.
Think of it less as a minor tweak and more as a fundamental upgrade for a high-performing home. We’ve seen firsthand how this one project can transform comfort and slash energy bills for families all across the region.
If your bills are climbing or some rooms just never feel right, your ducts are the first place you should investigate. A quick inspection can tell you a lot about where your money and your comfort are going.
Choosing the Right Insulation for Our North Texas Climate
Walking into the insulation aisle can feel overwhelming. You’re met with a wall of choices: fiberglass wrap, duct sleeves, rigid foam board, and more. So, what’s the right call for insulating HVAC ducts in a Texas home? The best answer depends on your specific ductwork and, just as importantly, where it's located.
For most of us here, the ductwork is running through the attic. That makes fiberglass wrap a fantastic go-to choice. It’s affordable and does a great job of wrapping both the round and rectangular ducts that are easy to get to.
But if you have ducts snaking through a tight crawlspace or exposed in a garage, rigid foam board is often a better bet. It's far more durable and stands up much better to potential moisture or accidental bumps, a real consideration for families with kids and pets.
Why R-Value Is So Important in North Texas
The single most important factor in your decision is the R-value. This number simply measures how well the insulation can resist heat flow. The higher the R-value, the better it insulates—and for our climate, where attics can feel like an oven by August, a higher R-value is absolutely essential.
The U.S. Department of Energy suggests a minimum of R-6 for ductwork. But from our experience building homes across North Texas, pushing that up to R-8 is one of the smartest investments a homeowner can make.
Sure, R-8 insulation might cost $50-$100 more for a typical project. But that extra thermal resistance can easily pay for itself within just a few brutal Texas summers. Just think about your AC running less often every single day from May through September. Those savings add up fast.
This chart really drives home how much of a difference proper insulation makes.
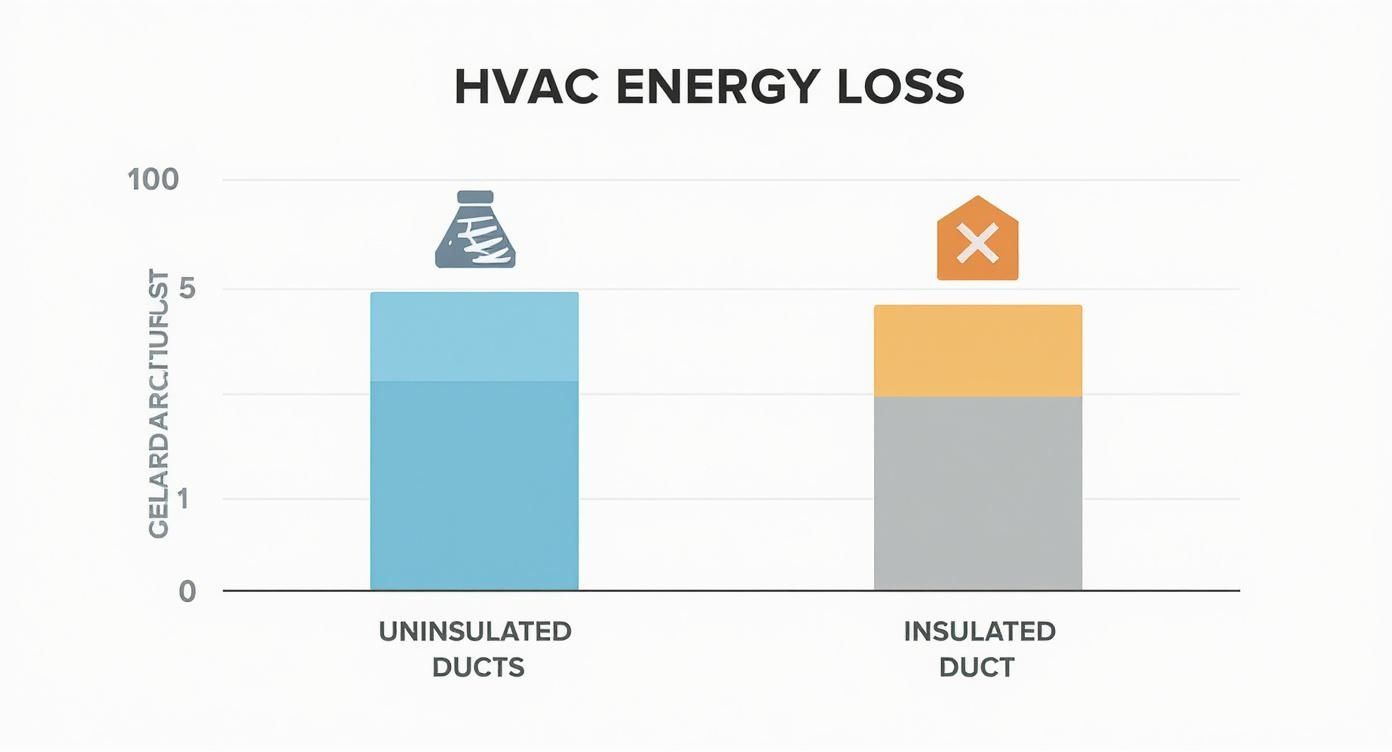
As you can see, uninsulated ducts are a massive source of wasted energy. Properly insulated ones, on the other hand, keep all that precious cool air contained and moving efficiently to where you need it.
HVAC Duct Insulation Comparison for North Texas Homes
To help you sort through the options, let's compare the most common materials. Materials like fiberglass, foam, and mineral wool are popular for a reason—they offer a mix of thermal resistance, moisture control, and even sound dampening. The demand for these materials is growing, as you can see in duct insulation market trends that show quality materials are becoming the standard.
Here’s a quick breakdown to help you pick the right one for your home.
Insulation Type | Typical R-Value | Average Cost (Per Linear Foot) | Best For | DIY Friendliness |
|---|---|---|---|---|
Fiberglass Wrap | R-6 to R-8 | $1.50 - $3.00 | Accessible ducts in attics or basements; a great all-around choice. | High |
Rigid Foam Board | R-4 to R-7 | $2.00 - $4.00 | Exposed ducts in garages, crawlspaces, or basements where durability counts. | Medium |
Duct Sleeves | R-6 to R-8 | $3.00 - $6.00 | Insulating or replacing flexible ducts; the simplest installation method. | High |
Spray Foam | R-3.5 to R-7 per inch | $4.00 - $7.00 | Sealing complex joints and connections; best left to professionals. | Low (Pro Job) |
Each of these has its place, but for most DIY projects in our area, fiberglass wrap offers the best balance of performance, cost, and ease of installation.
Here’s a little more detail on the top DIY choices:
Fiberglass Duct Wrap: This is the classic, and for good reason. It’s essentially a blanket of fiberglass with a foil backing that doubles as a vapor barrier. It’s perfect for accessible ducts but comes with one major rule: never compress it, or you’ll destroy its R-value.
Rigid Foam Board: Sold as polystyrene or polyisocyanurate panels, this is an excellent pick for ducts in areas that might get bumped or exposed to moisture. It offers a very high R-value for its thickness but does take more effort to cut and seal, especially around round ducts.
Duct Sleeves: Think of these as pre-made insulated tubes that you just slip over flexible ducts. If you’re replacing old, uninsulated flex ducts, just buying new, pre-insulated ones is by far the easiest way to go.
Pro Tip: When you’re wrapping ducts, you want a snug fit, not a tight one. If you pull the wrap too tight and compress the fiberglass, you can easily cut its insulating power in half. The air pockets trapped inside the fibers are what do all the real work.
Choosing the right material comes down to your budget, where your ducts are located, and how much work you want to put in. For most attic jobs around here, a quality R-8 fiberglass wrap is going to give you the best bang for your buck.
Getting Your Ductwork Ready: Prep and Sealing Comes First
Before you cut a single piece of insulation, there’s some prep work you cannot skip. Sealing your ducts is the foundation of this entire project. If you just wrap up leaky ductwork, you’re essentially putting a brand-new blanket on a system that's still bleeding cooled air into your attic.
It's like putting a new roof on a house with a cracked foundation. A proper seal guarantees all that conditioned air you're paying for actually makes it into your living spaces.
Hunting Down Every Last Leak
Air leaks are sneaky. They often show up where you least expect them, hiding in plain sight along the seams and connections where duct sections join together or meet the main HVAC unit.
A simple trick for finding them is the incense stick test. Turn on your HVAC fan (not the AC), then carefully hold a lit incense stick near every joint and connection point. If you see the smoke get pulled into a seam or blown away from it, you've found a leak.
Be extra thorough when checking these common trouble spots:
Joints between straight duct sections: Those long, straight runs are notorious for small, continuous gaps.
Connections at plenums and register boots: Check where the ducts meet the main unit and where they terminate at the floor or ceiling vents.
Elbows and T-junctions: Any place the ductwork changes direction is a prime candidate for a poor seal.
For those of us on rural properties outside Glen Rose or Weatherford, dust and even critters can make these leaks much worse over time. A really thorough inspection is key.
The Right Way to Clean and Seal
Once you've mapped out the leaky spots, you need to make sure your sealant will stick. The surfaces of your ducts, especially in a dusty North Texas attic, have to be spotless. Grab a rag and some denatured alcohol or a good degreaser and wipe down every surface you plan to seal.
Now for the main event: sealing. You have two fantastic options for this job.
Mastic Sealant: This is what the pros use. It’s a gooey, paint-on substance that creates a permanent, flexible seal that moves with your ducts as they expand and contract. Slather it on at least nickel-thick over every seam and joint with a cheap, disposable paintbrush.
UL 181-Rated Foil Tape: This is not your grandfather's hardware store foil tape. Look for the UL 181 rating, which means it’s specifically engineered for HVAC systems. It's perfect for covering larger holes or gaps before you go over them with mastic.
One Thing to Never, Ever Use: That classic gray, cloth-backed "duct tape." Ironically, it is the absolute worst choice for sealing ducts. The adhesive breaks down and becomes brittle under the heat of an attic, often failing in less than a year.
Applying mastic can be messy, but it truly is the most durable, long-term solution for creating an airtight system. Once every connection is clean, sealed, and dry, you’re finally ready to insulate HVAC ducts correctly.
Installation Techniques for Attics and Crawlspaces

With your ducts sealed up, it's time for the hands-on part. Your technique matters—a lot. Especially when you're working in the cramped, often sweltering conditions of a North Texas attic or a musty crawlspace.
The entire point is to wrap your ductwork in a continuous thermal blanket. The number one enemy of that blanket? Compression. When you squish fiberglass insulation, you’re squeezing out the trapped air that actually blocks heat transfer, destroying its R-value.
Mastering Fiberglass Duct Wrap
For the rigid metal ducts you see in most homes around Granbury, fiberglass wrap is your workhorse. Getting it right is simple if you stick to a few core principles.
Start by measuring the circumference of the duct, then add a couple of inches for a healthy overlap. A sharp utility knife will give you a clean cut.
As you wrap the duct, aim for a fit that's snug, but never tight. You should be able to slide your hand between the insulation and the duct without much effort. Once it’s in place, use UL 181-rated foil tape along the seams, pressing it down firmly to create an airtight seal.
Handling Bends and Joints: When you get to an elbow, you'll need to cut smaller, custom-fit pieces. It's a bit like wrapping an awkwardly shaped gift; use several pieces of tape to make sure every surface is covered with no gaps.
Supporting Your Ducts: Check that your ductwork is properly supported. The straps should go around the new insulation, not underneath it. If a strap digs into the insulation, it creates a compressed weak spot where heat can easily transfer.
A quick word on safety: working in attics and crawlspaces is messy business. Always wear long sleeves, gloves, a good dust mask, and safety glasses. Fiberglass particles are no joke.
Working with Flexible Ducts and in Tight Spaces
Flexible ducts (or flex ducts) need a slightly different touch. Often, the easiest path is to either replace the old sections with new, pre-insulated flex ducting or slide a purpose-built duct sleeve over what you already have.
Of course, tight quarters like a cramped crawlspace bring their own set of headaches. A pro tip is to pre-cut your insulation pieces on a flat, open surface—like your garage floor—before you head into the tight space.
In these tough spots, patience wins the day. It's far better to use several small, perfectly fitted pieces to get around an obstacle than to try and force a single large piece into place. The same idea applies when you need to insulate HVAC ducts in a finished area, a common design puzzle similar to what homeowners face when finishing basement ceilings in North Texas.
Once you finish a section, give it a final inspection. Run your hand along the seams and feel for any drafts or temperature differences. That quick double-check ensures all your hard work pays off.
Common Mistakes to Avoid When Insulating Ducts
Successfully insulating your HVAC ducts is just as much about what you don't do as what you do right. A few common oversights can completely undermine all your hard work. Here are the most common pitfalls we see in North Texas homes and how to steer clear of them.
Compressing the Insulation
This is, without a doubt, the number one mistake. Fiberglass insulation works because of the tiny air pockets trapped between its fibers. When you pull the wrap too tight or use straps that dig into it, you squeeze those air pockets out, destroying its insulating power.
Think of it like a down jacket; if you flatten it, it won't keep you warm. Your insulation should be snug, but never squished.
Skipping the Seal
I can’t say this enough: you must seal before you insulate. Wrapping ducts that are still leaking air is just hiding the problem, not fixing it. All that expensive cool air will keep leaking out into your hot Granbury attic, even with R-8 insulation wrapped around it. Always take the time to meticulously seal every joint with mastic or UL 181-rated foil tape first.
We’ve been called out to homes where the owner did a beautiful job wrapping the ducts, but their bills didn’t change. A quick look revealed unsealed joints underneath—a simple but costly oversight.
Leaving Gaps and Thermal Bridges
Every gap in your insulation creates a "thermal bridge"—a weak spot where attic heat can easily transfer into your cold ductwork. This usually happens around support straps, hangers, and complicated junctions.
To avoid this, pay extra attention to these areas:
Support Straps: Make sure the straps go over your new insulation, not under it where they’ll compress it.
Complex Joints: It’s worth the extra time to cut smaller, custom-shaped pieces to fit perfectly around elbows and T-junctions.
Connection Points: Ensure the insulation goes all the way up to the air handler and the register boots, leaving no metal exposed.
Using the Wrong Tape
Please, step away from the gray, cloth-backed "duct tape." It is the worst possible choice for this job. The adhesive can’t handle the extreme temperature swings in a North Texas attic and will get brittle and fail, often in less than a single year.
You absolutely have to use UL 181-rated foil tape for sealing the seams on your insulation wrap. Its adhesive is specifically engineered to bond permanently and withstand the harsh conditions of an HVAC system.
Avoiding these common errors is what separates a professional-quality job from a DIY disappointment.
When to Call a Professional for Your Ductwork
While sealing and insulating accessible ducts can be a rewarding DIY project, there's a fine line between a challenging task and a hazardous one. Knowing when to call for backup is key. Some situations are just too complex or dangerous for a weekend project.
If you come across any major damage—like crushed ducts, big tears, or joints that have completely separated—it’s time to get an expert on the phone. These aren't just minor leaks; they're problems that cripple your system's airflow and efficiency.
Signs You Need an Expert
Certain discoveries should be an immediate red flag, stopping your DIY project right in its tracks. These are potential health and safety risks that require specialized knowledge.
Keep an eye out for these clear warning signs:
Presence of Mold or Mildew: If you spot any mold on or inside your ducts, don't touch it. A professional needs to find the moisture source and handle remediation safely to keep spores from spreading through your home. This is especially crucial for families with allergies or young children.
Suspected Asbestos: In older homes around Weatherford and Glen Rose, it's not uncommon for ducts to be wrapped in materials containing asbestos. If the insulation is a chalky, white, or grayish wrap, stop everything and have it tested by a certified professional.
Extremely Difficult Access: When ducts are buried in a cramped crawlspace or a blistering hot, unventilated attic, the safety risks can easily outweigh the potential DIY savings. Professionals have the right gear and experience for these tough environments.
In one Granbury remodel, we found a huge crushed duct in an attic that a previous owner had tried to patch. This "fix" was choking off nearly all airflow to the upstairs bedrooms. We had to bring in an HVAC pro to restore proper function before we could even think about insulation.
Finding the Right Local Contractor
When you do need to hire out, look for a contractor with specific experience in HVAC systems, not just a general handyman. A true professional understands the dynamics of airflow, knows the right sealing techniques, and can insulate HVAC ducts to meet our specific North Texas energy codes.
Always check for a company with a strong local reputation and ask for references. A great contractor won't just patch the immediate problem; they’ll look at your entire system to make sure it's running efficiently. This is especially important during bigger renovations; you can get more tips in our guide to planning complex remodels.
Common Questions About Insulating Ducts
If you're thinking about insulating your HVAC ducts, you're not alone. Homeowners all over North Texas ask us the same great questions. Let's clear up some of the most common ones so you can decide if this is the right move for your home.
How Much Money Will I Actually Save?
It always depends on the house, but most homeowners in our area see their heating and cooling bills drop by 15-20%. If your ducts are in a scorching hot attic—which is the case for so many homes around Granbury and Weatherford—your savings could be even higher. We're talking about hundreds of dollars a year. It's one of the best bang-for-your-buck energy upgrades you can make.
Is This a Realistic DIY Project for a Beginner?
Absolutely, as long as you can easily get to your ducts and they're in decent shape. If you have exposed ductwork in an open attic or basement, sealing and wrapping them is a totally doable weekend project for most homeowners. But if your ducts are wedged into a tight crawlspace, or if you spot any damage or mold, it's smarter and safer to bring in a pro.
Will It Make My House Quieter?
Yes, and this is a fantastic bonus most people don't think about. The insulation itself, particularly fiberglass, does a great job of absorbing sound. You'll notice that "whoosh" of air moving through the vents is much quieter. It also muffles the little metallic pops and creaks that happen when your system kicks on and off. It’s a subtle change that just makes your home feel more peaceful.
The single most important step is to seal all the leaks before you wrap the ducts. Insulating leaky ducts is just trapping your wasted money in the attic. A proper seal makes sure the conditioned air you paid for actually makes it into your living room.
What's the One Thing I Absolutely Can't Skip?
Sealing the leaks. No question. You have to seal every single joint and seam before you even think about adding insulation. Insulating ducts that are leaking conditioned air is a total waste of time and money. Taking the extra hour to meticulously apply mastic or foil tape is what makes the entire project worthwhile. It’s the biggest mistake people make when they try to insulate HVAC ducts on their own.
Paying attention to details like duct insulation is what creates a truly comfortable and efficient home, whether you're building new or renovating. If you're planning a project in the North Texas area and have questions, the team at Gemini Homes is here to help you get the details right. Let's talk about your vision.
Comments