10 Expert Strategies for Decorating Open Floor Plans in North Texas
- scott shipp
- Jan 5
- 21 min read
Open floor plans are the heart of modern Texas living, offering a spacious, connected environment perfect for families in Granbury and Weatherford. But decorating open floor plans can feel like a puzzle. The lack of walls creates unique challenges in defining distinct living, dining, and kitchen areas without sacrificing that airy, expansive feel you love. The key isn't to build walls, but to create 'invisible' boundaries through smart, intentional design. How do you anchor a living room in a sea of space? How do you ensure your kitchen, dining area, and family room feel like distinct zones yet part of a cohesive whole?
From furniture placement that encourages conversation to a color palette that flows seamlessly from the kitchen to the great room, the right strategies can transform a vast space into a collection of cozy, functional zones. A well-designed open concept supports how North Texas families live, whether hosting a big gathering for the game or enjoying a quiet weeknight dinner. It’s about creating flow, purpose, and visual harmony. This guide offers 10 practical strategies for decorating open floor plans, complete with real-world examples from local homes. We'll explore how to balance cohesion with character, ensuring your home is both beautiful and perfectly suited to your family's lifestyle.
1. Zone Definition Through Furniture Arrangement
One of the most effective strategies for decorating open floor plans is to create distinct functional zones using your furniture. Instead of walls, you use strategic furniture placement to establish clear, purposeful areas for living, dining, and cooking while maintaining the airy, expansive feel that makes these layouts so popular in modern North Texas homes.
The key is to think of furniture groupings as "invisible rooms." By arranging pieces to anchor a specific activity, you create psychological boundaries that guide movement and use within the larger space. This approach is fundamental to making a large, open area feel organized, intentional, and comfortable rather than cavernous or chaotic.
How to Implement Furniture-Based Zoning
Successful zoning starts with anchoring your main living area. "Floating" a sofa or sectional in the middle of the room, rather than pushing it against a wall, instantly carves out a conversational space. Place a large area rug beneath it to visually contain the zone; the front legs of all seating should be on the rug.
A console table placed directly behind the floating sofa acts as a subtle but effective divider. This creates a functional and stylish border between the living area and an adjacent dining space or walkway, providing a surface for lamps, decor, or even a drop zone for keys. For retirees who often host family, this setup ensures clear pathways for grandkids to run around without disrupting the main seating area.
Practical Tips for North Texas Homeowners
Anchor with Large Rugs: Don't skimp on rug size. For a spacious Granbury great room, an 8x10 rug is often the minimum. A rug that's too small will make the furniture look like it's adrift.
Mind the Traffic Flow: As you arrange your zones, ensure you leave clear, intuitive pathways for walking between them. A common mistake is creating a beautiful living area that blocks the path to the back patio or kitchen. Aim for at least 36 inches for major walkways.
Scale Appropriately: In a new Weatherford build with high ceilings and a large footprint, select substantial furniture pieces that won't feel dwarfed by the space. Conversely, in a smaller open-concept remodel, choose more streamlined pieces to avoid a cluttered look.
Creating well-defined zones through furniture is the foundational step in decorating open floor plans. It brings order and purpose to the space, making it both beautiful and highly functional for everyday life.
2. Color Blocking and Cohesive Palette Strategy
Once you've established functional zones, the next step in decorating open floor plans is to unite them with a cohesive color palette. This strategy involves using a unified but varied color scheme across the entire space to create visual continuity while preventing monotony. It’s how you make distinct areas feel like they belong together in a single, harmonious home.
The goal is to select a primary color family and distribute different tones and shades of it intentionally throughout the interconnected living, dining, and kitchen areas. This creates a subtle flow that guides the eye smoothly from one zone to the next, making the expansive layout feel thoughtfully designed rather than like a collection of disparate parts. This is a key technique for ensuring large, open spaces in rural North Texas homes feel warm and inviting, not vast and impersonal.
How to Implement a Cohesive Palette
Begin by selecting a core palette of 3-4 coordinating colors. A common and effective approach for North Texas homes is to use a dominant warm neutral (like a soft greige or creamy white) on the main walls. Then, choose a slightly darker or more saturated shade of that same color for a feature, such as the kitchen island or a single accent wall visible from the living area.
For example, in a recent Glen Rose custom build, we used a warm white for the primary walls and trim. The kitchen island was then painted a deep, earthy green. That same green was subtly repeated in the throw pillows on the living room sofa and in the pattern of the dining room rug, creating a polished, designer look.
Practical Tips for North Texas Homeowners
Vary the Tone: To add depth, paint adjacent areas in coordinating but different tones of the same color. A living room in Sherwin-Williams' Agreeable Gray could flow beautifully into a kitchen with walls in the slightly darker Anew Gray.
Test on Large Swatches: Paint large sample boards and move them around the room at different times of day. The abundant Texas sun can dramatically alter how a color appears, so this step is crucial to avoid undertone clashes.
Coordinate Cabinetry: For a seamless transition, choose kitchen cabinet colors that coordinate directly with your main wall paint. A charcoal island pairs perfectly with a light gray wall, creating an intentional and grounded look.
Use Accent Colors Strategically: Reserve bold colors for specific, impactful areas like the back of a built-in bookshelf or a single accent wall. This adds personality without overwhelming the open concept.
A well-executed color strategy is essential for decorating open floor plans because it provides the visual glue that holds the entire space together.
3. Lighting Layers and Fixture Coordination
Beyond furniture, lighting is one of the most powerful tools for decorating open floor plans. A well-executed lighting plan uses different layers and coordinated fixtures to define zones, create ambiance, and ensure every part of the space is functional. It’s about more than just illuminating the room; it's about using light to sculpt the space and guide the eye, transforming a single large area into a collection of inviting, distinct environments.
This strategy involves layering three types of lighting: ambient (overall illumination), task (focused light for activities like cooking or reading), and accent (light that highlights architectural features or decor). By coordinating the style and finish of the fixtures that deliver this light, you create a cohesive design language that ties the entire open concept together, from the kitchen to the living area.

How to Implement a Layered Lighting Plan
Start by establishing the primary focal points. A large, dramatic chandelier over the dining table, for instance, clearly anchors that zone. Then, complement it with a series of pendant lights over the kitchen island in a matching finish, like brushed gold or oil-rubbed bronze. This creates a visual connection between the two distinct areas while providing essential task lighting for meal prep.
Ambient light, typically from recessed cans, should provide even, overall coverage. Task lighting is then added where needed, such as under-cabinet lighting in the kitchen or a floor lamp beside an armchair in the living area. Finally, accent lighting, like a spotlight on a piece of art or the stone fireplace common in Glen Rose homes, adds depth and character.
Practical Tips for North Texas Homeowners
Coordinate Finishes: Create a unified look by matching the finish of your light fixtures to other hardware in the space, such as your kitchen faucet, cabinet pulls, and door handles.
Install Dimmers Everywhere: Dimmers are non-negotiable in an open floor plan. They allow you to adjust the mood instantly, from bright and energetic for a party to soft and intimate for a quiet evening.
Plan Early: The best time to plan your lighting is during the design phase of a new build or major remodel. Integrating electrical plans early prevents costly drywall repairs and ensures outlets are where you need them. This foresight is a key factor in keeping a project on budget.
Consider Natural Light: In a sun-drenched Weatherford home, think about how natural light changes throughout the day. Your lighting plan should complement, not compete with, the sunlight from your windows.
A thoughtful, layered lighting scheme is essential for making an open floor plan feel both expansive and intimate. It’s a design element that marries form and function, adding significant value and comfort to your home.
4. Statement Flooring and Transitions
Your flooring itself can be a powerful tool for defining zones in an open floor plan. Using different flooring materials, patterns, or colors for distinct areas creates a clear, sophisticated visual boundary without erecting a single wall. This architectural approach to decorating open floor plans adds depth, character, and custom-built elegance to the space.
This technique is especially effective for separating functional "wet" areas like the kitchen from "dry" living spaces. A seamless transition between durable tile and warm hardwood not only delineates the kitchen's footprint but also adds significant visual interest, making the home feel intentionally designed and thoughtfully constructed.
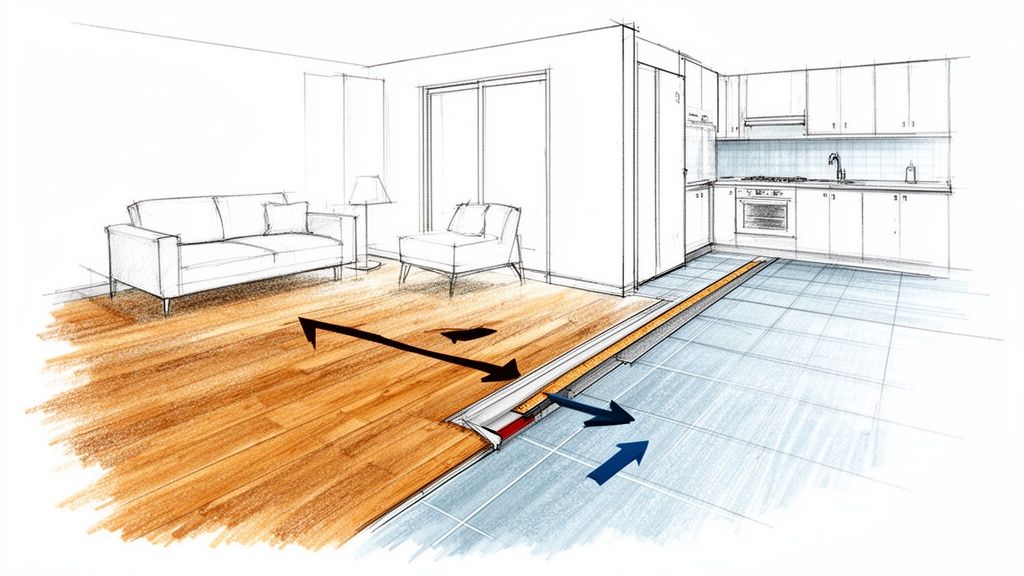
How to Implement Flooring Transitions
The key to a successful flooring transition is to make it look deliberate, not like an afterthought. For example, transitioning from a warm walnut hardwood in a Granbury living room to a large-format light gray porcelain tile in the kitchen creates a beautiful and practical separation. The transition line itself can be a simple, clean edge or embellished with a matching accent border for a more custom look.
Another popular method is to use a consistent material, like luxury vinyl plank (LVP), throughout the entire open space but introduce a different layout or pattern. A herringbone pattern in the dining area can distinguish it from a standard layout in the adjacent entryway, creating a subtle yet effective zone marker while maintaining material continuity.
Practical Tips for North Texas Homeowners
Coordinate Tones: Ensure your chosen materials share a consistent undertone (either warm or cool) to create a cohesive, not clashing, look. A cool gray tile pairs better with an ash-toned wood than a warm, red oak.
Plan for Smoothness: The goal is a perfectly level transition. This is best planned during initial construction or a major remodel to ensure subfloors are prepared correctly, preventing trip hazards that can be a concern for both young children and aging family members.
Prioritize Durability: For families with kids and pets, choose flooring that can handle Texas dust and foot traffic. Durable, stain-resistant materials like luxury vinyl plank (LVP) or porcelain tile are excellent choices for kitchen and entry zones.
Consider Resale Value: Classic combinations like hardwood and a neutral, high-quality tile are timeless and appeal to a wide range of future buyers in the North Texas market.
Using flooring to define your space is a foundational design choice that elevates the entire feel of your open floor plan, offering both beauty and clear, functional purpose.
5. Vertical Space Utilization and Wall Treatment
In a sprawling open floor plan, the expansive walls can feel either dauntingly empty or excitingly full of potential. The key to successfully decorating open floor plans is to use this vertical real estate strategically. By drawing the eye upward with thoughtful wall treatments and storage, you add character, dimension, and function without sacrificing a single square foot of floor space.
This approach treats your walls as more than just boundaries; they become integral parts of your design narrative. Using vertical elements helps to subtly define zones, create powerful focal points, and add the architectural interest that prevents an open concept from feeling like a sterile, one-note box.
How to Implement Vertical Design
One of the most impactful ways to utilize vertical space is with built-in shelving, particularly flanking a fireplace in a great room. This not only creates a stunning focal point visible from the kitchen and dining areas, but it also provides curated storage and display space. Another powerful tool is the accent wall. A shiplap or board-and-batten wall behind a dining set can visually anchor the dining zone, giving it presence and definition.
In the kitchen area, extending cabinetry to the ceiling creates a seamless, high-end look that draws the eye up and maximizes storage. This "wall" of cabinetry can act as a visual stop, cleanly separating the kitchen workspace from the more relaxed living or dining zones.
Practical Tips for North Texas Homeowners
Create a Single Focal Point: To avoid a visually chaotic space, choose one primary wall for a bold treatment. In a large open-concept Weatherford home, a stunning stone fireplace that reaches the ceiling is a classic choice that commands attention without overwhelming the senses.
Balance Open and Closed Storage: When planning built-ins, a mix of open shelving for decor and closed cabinets to hide clutter is ideal. This is especially useful for families who need to quickly tidy up toys or school supplies. For more tips, explore our 10 creative ideas for decorating blank walls in your North Texas home.
Consider Architectural Details: Simple additions like crown molding and substantial baseboards connect the vertical and horizontal planes, giving a custom-built home in Granbury a polished, cohesive feel that elevates the entire open floor plan.
By thoughtfully designing your vertical surfaces, you can add immense character and function, making your open-concept home feel intentional, organized, and beautifully complete.
6. Kitchen Island as Central Organizing Element
In the world of decorating open floor plans, the kitchen island often transcends its basic function to become the single most important organizing element. It serves as a powerful visual and functional anchor, physically delineating the kitchen zone from the living and dining areas without closing it off. This approach transforms the island into the command center of the home, facilitating everything from meal prep and casual dining to homework and social gatherings.
The island’s mass and placement naturally create a boundary and direct traffic flow, making it a highly effective tool for establishing order in a large, multi-purpose space. A well-designed island can set the aesthetic tone for the entire open-concept area, acting as a centerpiece that unites different zones through complementary materials and colors.
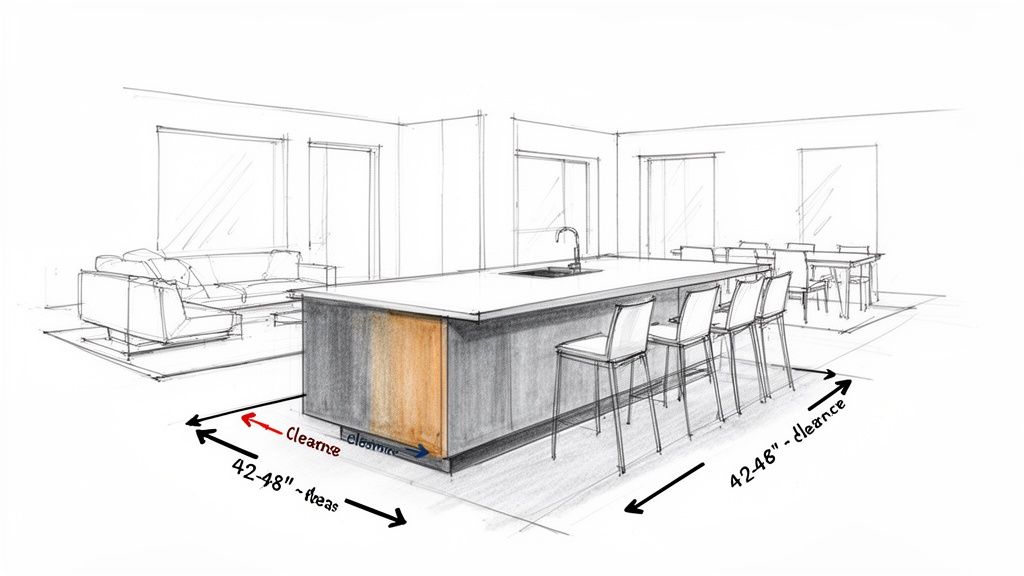
How to Implement the Island as an Anchor
To make the island a true central element, design it with intention. Consider a large walnut island with a waterfall countertop to create a stunning contrast against white perimeter cabinets, a popular choice in modern Granbury homes. This island can incorporate seating for three or four, instantly creating a casual dining spot.
Another effective strategy is to paint the island a contrasting color, like a deep gray or navy, to make it pop against neutral kitchen cabinetry. By adding functional elements like a built-in wine fridge, a second sink for prep work, or a warming drawer, the island becomes an indispensable workhorse that naturally draws people to the heart of the home.
Practical Tips for North Texas Homeowners
Plan for Clearance: Ensure you leave at least 42 to 48 inches of clearance on all working sides of the island. This is crucial for safe movement, opening appliance doors, and preventing bottlenecks in a busy family kitchen.
Emphasize with Lighting: Install a series of two or three statement pendant lights directly above the island. This not only provides essential task lighting but also visually frames the island, reinforcing its role as the room's focal point.
Comfortable Seating is Key: For an island to function as a dining or gathering spot, plan for a countertop overhang of at least 12 to 15 inches. This provides ample knee room for comfortable seating.
Integrate Utilities Early: The most impactful islands often have integrated electrical outlets, sinks, or appliances. These elements must be planned during the construction or major renovation phase, as they directly affect your foundation and framing. Understanding the factors that influence your investment is key; explore our detailed guide to learn more about a North Texas kitchen remodel cost breakdown.
Using the kitchen island as a central organizing element is a cornerstone of successful open-concept design. It provides structure, function, and style, creating a natural hub that connects the entire living space.
7. Textural Layering and Material Variety
While color and furniture define zones, texture and material bring an open floor plan to life, preventing it from feeling flat or monotonous. Textural layering involves strategically incorporating a diverse mix of materials like wood, metal, stone, and textiles. This creates tactile and visual interest that adds depth, warmth, and a sophisticated, curated feel to the space.
This approach is crucial for decorating open floor plans because it provides subtle sensory cues that help differentiate areas without adding physical barriers. The interplay of smooth stone, soft linen, rugged wood, and sleek metal adds richness and character, making a large, unified space feel more intimate and intentionally designed.
How to Implement Textural Layering
The goal is to create a harmonious blend, not a chaotic collection. A great example is combining warm wood cabinetry in the kitchen with cool marble countertops, a natural fiber runner, and brushed gold hardware. In the adjacent living area, you could echo these elements with a leather sofa, a wool throw blanket, and a metal-framed coffee table on a hardwood floor.
The key is maintaining a consistent color palette while varying the surfaces within it. For instance, in a modern farmhouse design, you might see rustic wood beams on the ceiling, a smooth stone fireplace surround, and plush upholstered seating. This technique is fundamental to achieving the style’s signature blend of cozy and chic. For more inspiration on this style, explore some popular farmhouse design concepts for North Texas homes.
Practical Tips for North Texas Homeowners
Mix Finishes: Contrast is key. Pair shiny surfaces, like a polished chrome light fixture, with matte finishes, such as a honed granite countertop or a rustic wooden dining table, to create visual tension and interest.
Embrace Natural Materials: Incorporate elements native to the Granbury landscape, like limestone for a fireplace or reclaimed wood for a mantle. These materials add authentic warmth and local character.
Layer Soft Furnishings: Don't underestimate the power of textiles. Add linen curtains, velvet pillows, and chunky knit throws to seating areas to instantly soften the space and improve acoustics, which is a common challenge in large, open rooms.
Balance Hard and Soft: Ensure a good mix of hard materials (metal, stone, wood) and soft ones (upholstery, rugs, drapes) in each zone to make the entire open concept feel comfortable and well-rounded.
By thoughtfully layering textures and materials, you can craft an open floor plan that is cohesive yet dynamic, making your home feel both expansive and invitingly detailed.
8. Strategic Furniture Scale and Proportion
One of the most challenging aspects of decorating open floor plans is selecting furniture that is correctly scaled to the space. The right scale and proportion ensure that your individual zones feel balanced and intentional, preventing a large great room from appearing either empty and sparse or overly crowded. It’s about creating a harmonious relationship between your furniture, the architecture, and the overall volume of the room.
Without walls to contain furniture, the size of each piece directly impacts the feel of the entire open area. Substantial, well-proportioned furniture can anchor a zone effectively in a grand Weatherford home with soaring ceilings, while more streamlined, lower-profile pieces can make a smaller open-concept layout feel spacious and uncluttered. Getting the scale right is crucial for both function and aesthetic cohesion.
How to Implement Proper Furniture Scaling
Begin by measuring your entire open area and the specific zones you’ve mapped out. A common mistake is choosing a beautiful sectional that's simply too large, overwhelming the living area and impeding traffic flow. Conversely, a dining set that's too small can get lost in a cavernous space.
For example, a low-profile sectional paired with a large, low coffee table can feel grounded and appropriate in a room with 12-foot ceilings, as it keeps the visual weight low and allows the eye to appreciate the vertical space. Similarly, a dining table needs at least 36 inches of clearance on all sides to allow for chairs to be pulled out and for comfortable movement around the zone.
Practical Tips for North Texas Homeowners
Measure and Map: Before you buy anything, use painter's tape to mark the footprint of potential furniture pieces on your floor. This helps you visualize the scale and its impact on traffic flow.
Balance High Ceilings: In new Granbury builds with vaulted ceilings, use vertical elements like tall bookshelves, floor-to-ceiling drapery, or a large-scale piece of art to draw the eye upward and balance the horizontal lines of your furniture.
Consider Visual Weight: A leggy sofa with visible space underneath has less visual weight than a heavy, skirted one, making it a better choice for smaller open plans. Glass or acrylic tables also create an illusion of spaciousness.
Leave Breathing Room: A well-designed room isn't filled to the brim. Aim to leave around 30% of your floor space open to maintain that airy, uncluttered feel that makes open concepts so desirable.
Mastering scale and proportion ensures every piece of furniture contributes positively to the room, making your open floor plan feel both impressive and intimately comfortable.
9. Visual Continuity Through Window Treatments and Soft Furnishings
While furniture and rugs define separate zones, window treatments and soft furnishings are the threads that tie them all together. Using a consistent approach to these elements creates a visual rhythm that guides the eye smoothly across the entire open floor plan. This strategy is essential for achieving a polished, cohesive look that feels intentional rather than like a collection of disparate areas.
The goal is to establish a unified backdrop that enhances the expansive feel of the space. By repeating colors, textures, and styles in curtains, pillows, and throws, you build a subtle yet powerful connection between the living, dining, and kitchen zones. This technique is a key part of decorating open floor plans because it brings harmony to the entire area without adding clutter.
How to Implement Visual Continuity
Start by selecting a single style and color palette for all window treatments within the open-concept area. For example, installing floor-to-ceiling sheer linen curtains on all windows instantly creates a sense of unity and height. The fabric and color from these treatments then become the inspiration for other soft furnishings.
Repeat the light, airy feel of the linen curtains with similarly hued throw pillows on the sofa and a textured throw blanket draped over a chair. In the dining area, upholstered chairs in a coordinating neutral fabric or a table runner that picks up on the curtain color would further strengthen the connection, making the entire great room feel like a single, thoughtfully designed space.
Practical Tips for North Texas Homeowners
Elevate the Room: Install curtain rods as high and wide as possible, close to the ceiling. This draws the eye upward, making the already generous ceilings in many Weatherford homes feel even more grand.
Coordinate, Don't Match: The key is cohesion, not perfect matching. Select a primary color from your drapes and use varying shades and textures of it in your pillows, rugs, and upholstery for a sophisticated, layered look.
Layer for Light and Style: In sunny North Texas, light control is crucial. Layer sheer curtains with heavier, blackout drapes. This provides privacy and insulation while offering flexible options for adjusting natural light throughout the day.
Invest in Quality: For high-traffic family homes in Granbury, choose durable, high-quality fabrics for both window treatments and soft furnishings to ensure they stand up to daily life and continue looking great for years.
Using a coordinated approach to window treatments and textiles is a sophisticated method for decorating open floor plans, ensuring the final result is harmonious, elegant, and perfectly unified.
10. Functional Zoning with Integrated Storage Solutions
Effective storage is the unsung hero of decorating open floor plans, and integrating it directly into your home's architecture is a game-changing strategy. Instead of relying on standalone furniture, custom built-ins and cabinetry can define zones, create separation, and drastically reduce the visual clutter that can make an open concept feel chaotic and disorganized.
This approach involves designing storage solutions that serve a dual purpose: they provide highly functional organization while also acting as architectural elements that delineate space. A well-designed built-in can be a stylish divider, a focal point, and a workhorse for organization, all at once, making your open layout feel both expansive and impeccably tidy.
How to Implement Storage-Based Zoning
The key to this strategy is planning storage as part of the home's structure, ideally during a new build or a significant remodel. For example, a floor-to-ceiling bank of custom pantry cabinets can be designed to separate the kitchen from the dining area. While it serves as a wall, its primary function is providing critical kitchen storage, and its finish can be matched to the kitchen cabinetry to create a cohesive look.
Another powerful application is anchoring a living room with a custom media unit. A full wall of built-in shelving and cabinetry for electronics not only organizes media clutter but also firmly establishes that zone as the entertainment hub. Similarly, a large kitchen island with integrated wine storage, trash pull-outs, and deep drawers for pots and pans creates a functional barrier between the cooking and living zones.
Practical Tips for North Texas Homeowners
Integrate Finishes Carefully: Design your built-in cabinetry to either perfectly match your kitchen finishes for a seamless flow or choose a bold, contrasting color to make it a statement piece that intentionally defines a separate zone.
Plan for True Functionality: Don't just build shelves. Work with your designer to include drawer dividers, pull-out trays, and concealed compartments for things like trash bins. This internal organization is vital in an open plan where clutter is always on display.
Balance Open and Closed Storage: Use open shelving to display curated decor, books, and collections, which adds personality. A good rule of thumb is to keep at least 40% of open shelf space empty to avoid a cluttered look that can overwhelm a Weatherford great room.
Consider a 'Half Wall' Built-in: A bookcase or cabinet that is counter-height can divide a room, like separating a home office nook from the main living area, without sacrificing the sightlines and natural light that make open plans desirable.
By weaving storage directly into the fabric of your home, you solve the biggest challenge of open-concept living. This approach creates a clean, organized, and functionally zoned space that supports everyday life beautifully.
Open Floor Plan Decorating: 10-Point Comparison
Title | Implementation complexity | Resource requirements | Expected outcomes | Ideal use cases | Key advantages |
|---|---|---|---|---|---|
Zone Definition Through Furniture Arrangement | Low — layout planning and staging | Low — furniture, rugs, accessories | Distinct functional zones while preserving openness | Open-plan homes, renters, flexible households | Flexible, cost‑effective, preserves sightlines |
Color Blocking and Cohesive Palette Strategy | Medium — color selection and testing | Low–Medium — paint, samples, accessories | Visual continuity and perceived larger space | Whole‑home remodels, new builds, cohesive aesthetic goals | Harmonizes spaces; easy accessory updates |
Lighting Layers and Fixture Coordination | High — electrical planning and fixture placement | Medium–High — fixtures, wiring, dimmers | Zones defined by light; improved function and mood control | New construction, major remodels, task‑oriented areas | Defines zones without walls; enhances atmosphere |
Statement Flooring and Transitions | High — construction coordination and detailing | High — mixed materials, installation labor | Clear zone definition, guided traffic flow, durability | New builds or major remodels where floors can be changed | Appropriate material per function; strong visual interest |
Vertical Space Utilization and Wall Treatment | Medium — carpentry and styling | Medium — built‑ins, finishes, materials | Added focal points, storage, and vertical emphasis | High‑ceiling homes, spaces needing storage and character | Adds personality and storage without using floor area |
Kitchen Island as Central Organizing Element | Medium–High — layout plus plumbing/electrical | Medium–High — cabinetry, countertop, utilities | Kitchen anchored as social and functional hub | Family kitchens with sufficient square footage | Multi‑function island increases storage, seating, interaction |
Textural Layering and Material Variety | Medium — curated material selection | Medium — varied finishes, textiles, accents | Warmth, depth, and tactile interest across spaces | Homes seeking layered, sophisticated interiors | Creates visual depth; softens modern spaces; masks flaws |
Strategic Furniture Scale and Proportion | Medium — measurement and space planning | Low–Medium — appropriately sized furniture | Balanced zones with comfortable circulation | Any open plan needing cohesive furnishing | Prevents cramped or empty feel; improves flow and usability |
Visual Continuity Through Window Treatments and Soft Furnishings | Medium — fabric selection and coordination | Medium — curtains, rods, upholstery, rugs | Unified appearance, better acoustics and light control | Homes with multiple windows; living/dining sightlines | Softens hard surfaces; enhances cohesion and privacy |
Functional Zoning with Integrated Storage Solutions | High — custom design and installation | High — built‑ins, cabinetry, hardware | Decluttered, clearly defined zones with optimized storage | Families, storage‑heavy households, custom builds | Maximizes function, reduces visual clutter, adds value |
Creating Your Cohesive Space from the Ground Up
Navigating the world of decorating open floor plans can feel like conducting an orchestra. Each element, from furniture placement to lighting design, is an instrument that must play in harmony with the others. We’ve explored ten key strategies, moving beyond generic advice to give you a blueprint for creating a space that is both breathtakingly open and beautifully defined. By now, you understand that the secret isn’t about filling the space, but about skillfully curating it.
At its heart, a successful open-concept design is a masterclass in balance. It’s the balance between distinct, functional zones and a seamless, unified aesthetic. It’s the interplay between expansive sightlines and intimate, cozy nooks. Achieving this requires a multi-layered approach, just as we've discussed.
The Foundation: Zoning and Flow
The most crucial takeaway is the power of intentional zoning. Remember, you’re not just placing furniture; you’re building invisible rooms without walls.
Furniture Groupings: Use sofas, consoles, and chairs to create conversational "islands."
Area Rugs: Think of rugs as the foundation for each zone, anchoring the furniture and adding a layer of texture and color.
Strategic Lighting: A statement chandelier over the dining area or pendants above the kitchen island act as powerful visual cues, defining purpose from above.
In a North Texas custom home, where family gatherings can spill from the kitchen to the living room and out onto the patio, this thoughtful zoning ensures that a space can host thirty people for a holiday party as comfortably as it hosts two people on a quiet Tuesday night.
The Unifying Thread: Cohesion and Continuity
Once your zones are established, the next step is to weave them together into a single, compelling narrative. This is where your cohesive palette and material choices become paramount.
Color Strategy: Use a consistent, neutral base color on the walls throughout the entire open area to create a canvas. Then, introduce two or three accent colors in varying shades and applications-from pillows in the living area to backsplash tile in the kitchen-to create a rhythmic flow.
Material Harmony: Repeat key materials and finishes. The warm wood tones of your kitchen island could be echoed in the mantel of your Granbury stone fireplace or the floating shelves in your living area. This repetition is subtle but incredibly effective at making a large space feel intentional and connected.
Vertical Space: Don't forget to draw the eye upward. Floor-to-ceiling draperies, a gallery wall that climbs up a staircase, or a dramatic light fixture all utilize the vertical volume of the room, preventing the design from feeling flat and one-dimensional.
From Blueprint to Beautiful Reality
Mastering the art of decorating open floor plans transforms a house into a home tailored precisely to your lifestyle. It’s about creating an environment that supports everything from boisterous family game nights to quiet mornings with a cup of coffee and a view of the Texas sunrise. These principles aren't just decorative; they are foundational to the function and feel of your home. By integrating these strategies from the earliest design phases of a new build or remodel, you ensure that every outlet, window, and wall is placed with your final vision in mind. This foresight prevents costly changes later and guarantees a result that is not just beautiful, but deeply and intuitively livable.
Thinking about a custom home or major remodel in Granbury, Weatherford, or the surrounding North Texas area? The best time to plan for a flawless open-concept design is before the first wall is ever built. Our design-build team specializes in translating these principles into functional, beautiful floor plans that serve as the perfect foundation for your life. Contact Gemini Homes today for a no-obligation consultation to explore how we can build your dream space together.
Comments