A Practical Guide to Insulate HVAC Ducts and Save Money
- scott shipp
- Jan 18
- 15 min read
Ever wonder why your energy bills go through the roof every summer, even when you’re constantly fiddling with the thermostat? The culprit is often hiding right above your head in the attic or tucked away in your crawlspace.
One of the single most effective upgrades you can make for your home's efficiency and comfort is insulating your HVAC ducts. It's a project that stops all that precious cooled air from getting lost before it ever makes it to your living room.
Why Duct Insulation Is a North Texas Necessity
Picture your HVAC ducts as the arteries of your home, delivering conditioned air exactly where you need it. Here in North Texas, those ducts often snake through brutally hot spaces. An attic in Granbury can easily hit 120°F or more in the dead of summer.
Now, imagine sending cool, 55-degree air through a thin metal duct roasting in that kind of heat. It’s like trying to run an ice-cold drink through a hot pipe—it warms up fast.
This heat transfer makes your air conditioner work way harder and run much longer to get your home to the temperature on your thermostat. You're literally paying to cool your attic instead of your house. The same thing happens in reverse during our chilly winters, with uninsulated ducts in a cold crawlspace stealing heat from the warm air your furnace is pushing out.
This is a perfect visual of the problem. You can see how unsealed, uninsulated ducts just bleed conditioned air into the attic through leaks and heat transfer.
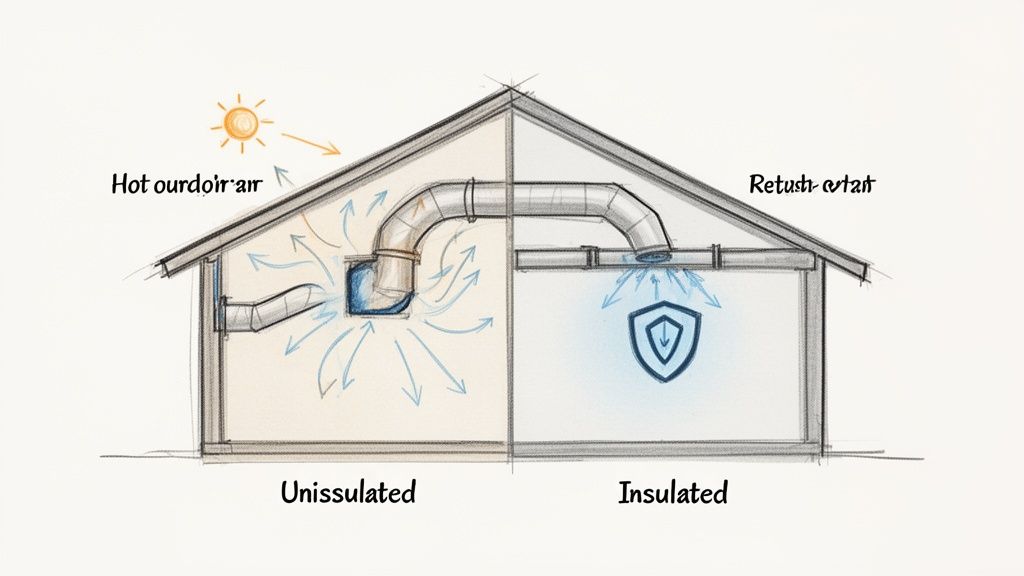
Sealing and wrapping these pathways is the key to making sure the air your system worked so hard to produce actually arrives at its destination.
The Real-World Impact on Your Home
The fallout from uninsulated ducts is about more than just a shocking electric bill. You feel it all over your home, from your comfort and air quality right down to the lifespan of your HVAC system.
Here’s what you stand to gain when you finally insulate your HVAC ducts:
Lower Utility Bills: This is the big one, and the benefit you'll notice right away. You stop throwing money away by heating or cooling your attic, crawlspace, or garage.
Consistent Home Comfort: Say goodbye to those annoying hot and cold spots. When the air coming out of your vents is the right temperature, every room feels more balanced—from the master suite to the guest bedroom in your new build out in Weatherford.
Improved Indoor Air Quality: Leaky, uninsulated ducts can suck dust, allergens, and nasty particles from unconditioned spaces and pump them straight into your home. A properly sealed and insulated system keeps the air you breathe much cleaner.
Reduced HVAC Strain: When your system isn't constantly fighting to make up for temperature loss, it runs less. That means less wear and tear, a longer life for your expensive equipment, and fewer surprise repair bills.
Studies have shown that a typical duct system can lose a staggering 25% to 40% of its heating or cooling energy through leaks and poor insulation. For families here in Glen Rose and across North Texas, that's a huge chunk of your utility payment just vanishing.
This isn't just a minor upgrade; it's a fundamental part of making your home perform the way it should. Think of it like seasonal maintenance—it protects your investment and keeps everything running efficiently. For more ways to keep your home in prime condition, take a look at our essential fall home maintenance checklist for North Texas homeowners.
And if you’re building a new custom home or planning a major remodel, making sure the ductwork is properly sealed and insulated from the very start is non-negotiable for lasting comfort and savings.
Choosing the Right Insulation Materials for Your Ducts
When you start looking at insulation, the options can feel a bit overwhelming. But picking the right material for your North Texas home is more straightforward than it seems. The best choice really boils down to where your ducts are located, your budget, and whether you're planning to tackle this yourself.
The most common materials all have their place, whether we're talking about a new build out near Stephenville or a historic home renovation in Glen Rose. Let’s look at the top contenders.
Fiberglass Duct Wrap
This is the classic you probably picture when you think of duct insulation. Fiberglass wrap is essentially a thick blanket with a foil or vinyl facing on one side. That facing is more than just for show—it's a vapor barrier, which is absolutely critical for stopping condensation in our humid Texas summers.
It’s the go-to for most standard jobs involving round or rectangular metal ducts in open spaces like attics, basements, or garages. If you’re building a custom home in Granbury and the ducts are easy to reach before the drywall goes up, fiberglass wrap is a fantastic and cost-effective choice. It’s also pretty manageable for a DIYer, as long as you take the right safety precautions.
Rigid Foam Board
Think of rigid foam board as large, sturdy sheets of insulation, typically made from materials like polystyrene. These panels pack a lot of insulating power into a slim profile and stand up well to moisture, which is always a bonus.
This is my go-to solution for tight spaces or areas where ducts might get bumped around. Picture the cramped crawlspace under a pier-and-beam house in Weatherford. Trying to wrestle with bulky fiberglass down there is a nightmare, but cutting and fitting rigid foam board is much cleaner. You can build a durable, highly-insulated box right around the ductwork.
Spray Foam Insulation
When you need a perfectly seamless, airtight seal, nothing beats spray foam. It goes on as a liquid and expands to fill every single crack and gap, creating an incredible barrier against both heat transfer and air leaks. It basically does two jobs in one.
Of course, that high performance comes with a higher price tag and absolutely requires a professional installer. You can’t just buy a can of this stuff at the hardware store for a whole duct system. Spray foam really shines in complex situations, like insulating ducts running through odd-shaped floor joists or sealing connections that are otherwise impossible to reach properly.
Understanding R-Value for Our Climate
No matter what material you lean toward, the single most important number to know is the R-value. This simply measures how well the insulation resists heat flow. A higher R-value means better performance. And don't be fooled—thicker doesn't always mean better. The material's composition is what really counts.
Here in North Texas, the U.S. Department of Energy places us in Climate Zone 3, and they have specific recommendations for getting the most out of your insulation.
Expert Insight: For any ducts running through unconditioned spaces like your attic, the Department of Energy recommends a minimum of R-8 insulation. If your ducts are in a slightly more protected area, like a vented crawlspace, you can often get by with R-6. Cutting corners on R-value is one of the costliest mistakes you can make in the long run.
Choosing an insulation that meets or, even better, exceeds these local guidelines is what makes the project a worthwhile investment. It's the key to stopping that blistering summer heat from seeping into your cool, conditioned air.
Comparing Duct Insulation Materials for Your Texas Home
To help you decide, here’s a quick-glance comparison of the most common duct insulation options you’ll find. We've laid out their typical R-values, where they work best, and what to expect in terms of cost and installation.
Insulation Type | Typical R-Value | Best For | DIY-Friendliness | Pros & Cons |
|---|---|---|---|---|
Fiberglass Wrap | R-3 to R-4 per inch | Accessible round or rectangular ducts in attics, basements, and garages. | High | Pro: Most affordable option. Con: Can be messy; requires protective gear. |
Rigid Foam Board | R-4 to R-7 per inch | Tight crawlspaces, exposed ducts needing durability, or creating custom enclosures. | Moderate | Pro: High R-value for its thickness. Con: Requires precise cutting and sealing of seams. |
Spray Foam | R-3.5 to R-7 per inch | Irregularly shaped areas, sealing hard-to-reach air leaks, maximum performance. | Low (Pro Only) | Pro: Creates a perfect air and thermal seal. Con: Highest cost and requires professional installation. |
So what’s the verdict? For most standard jobs in homes around Hood and Parker counties, fiberglass wrap gives you the best bang for your buck. But if you’ve got some tricky spots or you're aiming for the highest possible efficiency, the foam options are a fantastic upgrade.
How to Properly Insulate Your HVAC Ducts
Now that you’ve picked out the right materials, it's time to get your hands dirty. Insulating your HVAC ducts is a project that requires patience and a close eye for detail, but the payoff in both home comfort and energy savings is absolutely worth it. The secret to a job well done is doing things in the right order and steering clear of a few common—and costly—mistakes.
Most people want to jump right into wrapping the ducts, but they miss the most critical first step. Before you even think about insulation, you have to seal every single leak. Insulation is great at slowing down heat transfer, but it does absolutely nothing to stop air from escaping. Wrapping leaky ducts is like putting a winter coat on a sieve; you aren't fixing the real problem.
The Foundation: Seal Everything First
The joints, seams, and connections where duct sections meet are the usual suspects for air loss. Over the years, vibrations from your HVAC system, plus the constant expansion and contraction from temperature swings, can create small gaps. That's your expensive heated and cooled air pouring right into the attic or crawlspace.
To tackle this the right way, you’ll need either mastic sealant or UL 181-rated foil tape. Mastic is a thick, gooey sealant you paint on, and it creates a permanent, incredibly durable seal. The specialized foil tape is designed specifically for this job, with a high-adhesion backing that can handle the extreme temperatures in an attic. Whatever you do, never use standard grey "duct tape." Its adhesive will dry out and fail within a year, leaving you right back where you started.
Go through your duct system piece by piece and carefully apply your sealant to every connection point. Be thorough. This single step is the true foundation for the success of the entire project.
The U.S. Department of Energy has found that simply sealing duct leaks can slash heating and cooling costs by up to 20% on its own. Add in the fact that poor insulation can let another 30% of your conditioned air escape, and it’s clear: sealing and insulating together is the knockout punch for maximum savings.
Prepping Your Ducts and Workspace
Once all the seams are sealed and the mastic has fully cured (if you went that route), it's time to prep. Insulation wrap and foil tape won't stick to dirty, grimy surfaces. Grab a damp cloth and give the entire exterior of your ductwork a good wipe-down to remove all that built-up dust.
While you're at it, get your workspace ready. Attics in Granbury and Weatherford homes are notoriously tight, hot, and dark. Make sure you have a good work light, and consider laying a few pieces of plywood across the joists to create a stable surface to work from. It beats balancing on a 2x4.
This is also where safety becomes a top priority. Working with any kind of insulation, especially fiberglass, means you need the right personal protective equipment (PPE).
Gloves: A must-have to protect your hands from cuts and skin irritation.
Safety Glasses or Goggles: Keep nasty dust and fibers out of your eyes.
Dust Mask or Respirator: This one is non-negotiable. You don't want to be breathing in airborne particles.
Long-Sleeved Shirt and Pants: This minimizes skin contact with the insulation fibers.
And let's be real—working in a North Texas attic in the summer is brutal. Plan to tackle this job early in the morning before the heat gets unbearable, drink plenty of water, and don’t be a hero. Take breaks.
The Art of Measuring and Wrapping
With your ducts sealed, clean, and your workspace set, you can finally start insulating. Your goal is to create a snug, continuous blanket around the ductwork without squishing the insulation.
First, measure the circumference of your duct. A flexible sewing tape measure is perfect for this. Add about two inches to that measurement to make sure you have a healthy overlap when you wrap it. Next, use a straight edge and a sharp utility knife with a fresh blade to cut your insulation wrap to the right length.
This visual guide shows the common insulation types you might be working with, from flexible fiberglass rolls to rigid foam boards.

While each material has a slightly different application method, the core principles of a good seal and avoiding compression are the same for all of them.
Now, carefully wrap the section of insulation around the duct. Make sure the foil or vinyl vapor barrier is facing out. The insulation should fit snugly, but you shouldn't have to pull it tight. If you compress the insulation, you squeeze out the tiny air pockets that give it its R-value, which torpedoes its effectiveness. This is the single biggest mistake people make, and it can completely undo all your hard work.
Use your foil tape to secure the long seam where the insulation overlaps. Then, tape the edges where one piece of insulation meets the next. You want to create a continuous, seamless jacket with no gaps. When you get to bends and junctions, you'll likely need to cut smaller, custom-fit pieces to get complete coverage. This is where things can get tricky, and it's one reason homeowners call in a pro. The principles are a lot like those used when finishing basement ceilings in North Texas, where precise cuts and perfect seals make all the difference.
Take your time with it. Every seam you tape is another win against energy loss. By following these steps, you’ll do the job right and reap the benefits for years.
Understanding the Costs and Realizing the Savings
Alright, let's talk about the bottom line. Is insulating your ducts really worth the time and money? For homeowners across North Texas, the answer is a definite yes. This isn't just about feeling more comfortable; it's a solid financial move that pays you back every single month.
The upfront investment can swing quite a bit based on your home's unique layout. The total square footage, how much ductwork you have, and how easy it is to get to will all factor in. Insulating the ducts in a wide-open attic of a newer Godley home is going to be a different ballgame than tackling the tight crawlspace of an older pier-and-beam house in Glen Rose.
Breaking Down the Investment
So, what should you budget for? The final number really depends on whether you decide to tackle this yourself or bring in a pro.
DIY Costs: If you're going the DIY route, your expenses are all about materials. For an average-sized home, expect to spend somewhere between $250 and $800 for duct wrap, mastic sealant, foil tape, and the right safety gear.
Professional Installation: Hiring an expert crew means it gets done right and you get to keep your weekend. Around the Granbury and Weatherford area, a professional job typically runs from $1,500 to $3,500+, depending on the size and complexity of your duct system.
While hiring a pro costs more upfront, you get the peace of mind that every seam is sealed tight and every inch is insulated for peak performance. It's one of those home improvements where the quality of the work directly determines your savings. To see how this project stacks up against others, take a look at our guide on maximizing your home remodel return on investment in North Texas.
The Real-World Payback
This is the best part: the savings. The data from energy experts is pretty compelling. According to the Department of Energy, a typical HVAC system can lose up to 30% of the air it cools or heats through leaky, uninsulated ducts. That's a huge waste. By sealing and insulating, you can slash that waste and see a significant drop in your energy bills—some estimates show savings between $300 and $700 a year. You can learn more about the role of air ducts in energy efficiency to see the full picture.
Let’s put that into perspective. Think about a 2,500-square-foot home in Cleburne with ducts running through a scorching hot attic. That homeowner could be losing $60 to $100 every single month during the summer. Insulating those ducts puts that money right back in their pocket.
Over five years, those savings can easily hit $2,000 or more. The project doesn't just pay for itself; it starts making you money. You're not just spending on an upgrade; you're investing in a more efficient, valuable, and comfortable home for the long haul.
Common Duct Insulation Mistakes and When to Call a Pro
Even a seemingly simple DIY project can go wrong if you don't know the common pitfalls. When it comes to insulating HVAC ducts, a few simple mistakes can completely wipe out all your hard work and investment. We've seen it time and again in homes all over North Texas, from Weatherford to Glen Rose, and we want to help you get it right the first time.
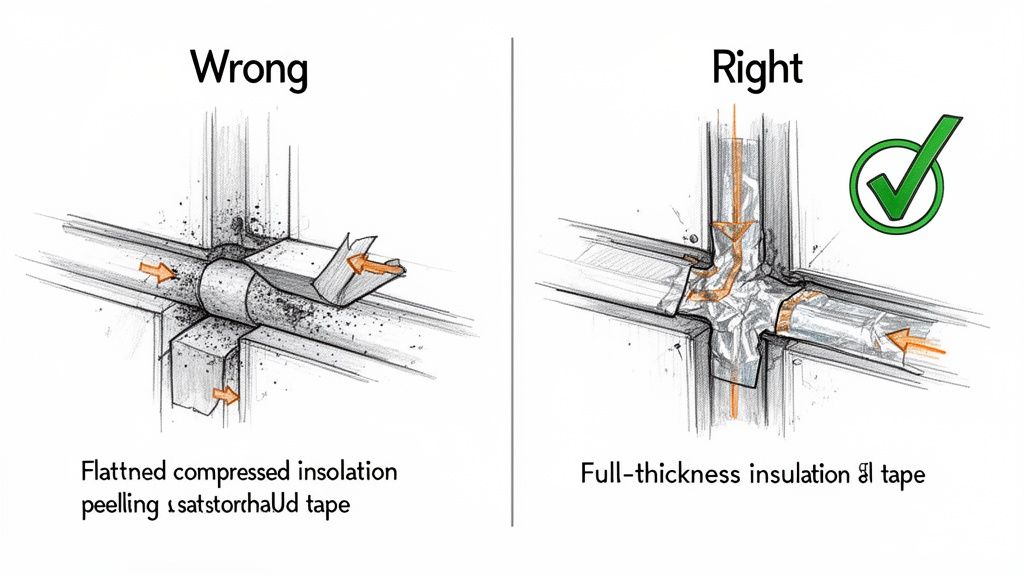
This picture says it all. It shows the stark difference between a job done right and one that's already failing. You're aiming for that seamless, full-thickness wrap, not a compressed, peeling mess.
Pitfalls to Avoid on Your Insulation Project
Making sure your project actually delivers on energy savings means steering clear of a few common blunders. Pay close attention to these frequent missteps.
Using Standard Duct Tape: This is the classic mistake, and it's an easy one to make. Despite the name, that grey utility tape you grab at the hardware store isn't made for sealing ducts. Its adhesive just can't handle the wild temperature swings in a Texas attic. It will dry out, crack, and fail—often in less than a year. You absolutely have to use a proper mastic sealant or a UL 181-rated foil tape for a seal that lasts.
Compressing the Insulation: This is probably the most costly error you can make. The insulation's power—its R-value—comes from the millions of tiny air pockets trapped inside the material. When you wrap the insulation too tight or cinch it down with straps, you crush those air pockets and destroy its effectiveness. The goal is a snug fit, never a compressed one.
Skipping the Sealing Step: So many homeowners are eager to get to the wrapping part that they completely miss the most critical step. Insulation slows heat transfer, but it does absolutely nothing to stop air leaks. You must seal every single joint and seam before you insulate. Otherwise, you're just wrapping a blanket around a leaky system.
Key Takeaway: The success of your duct insulation project lives in the details. A perfect seal, the right materials, and a careful installation without compression are non-negotiable for getting the energy efficiency and comfort you're after.
Knowing When to Call a Professional
A DIY approach is great, but it's just as important to recognize your limits. There are some clear signs that tell you it’s time to bring in an expert—it’s often the safer, smarter, and more effective choice in the long run.
You should seriously consider calling a professional if you run into any of these situations:
Hard-to-Access Ductwork: If your ducts are buried in tight crawlspaces, crammed into awkward attic corners, or hidden behind walls, a pro has the right equipment and experience to get the job done safely and correctly.
Signs of Mold or Moisture: Seeing condensation, water stains, or anything that looks like mold on your ductwork is a major red flag. This points to a bigger problem with moisture that an expert needs to diagnose to protect your home and your family's health.
Extensive or Damaged Ducts: If you spot crushed sections, joints that have come apart, or you just have a huge, complex network of ducts, it’s best to get a professional assessment. They can find and fix the damage to make sure the whole system is airtight before any insulation goes on.
You Want Guaranteed Results: Let's be honest, sometimes you just want the peace of mind that comes from a job done to the highest possible standard. Hiring a pro is the best way to guarantee you'll get optimal performance and lasting energy savings.
For those more complex projects, or for any homeowner in the Granbury area who simply wants the job done right, our team at Gemini Homes is here to help. We can give you a clear, honest assessment and handle the entire installation from start to finish.
Your Top Duct Insulation Questions Answered
We get a lot of questions from homeowners about whether it’s truly worth it to insulate HVAC ducts. Let's get right into the most common concerns we hear from families in Granbury, Weatherford, and across North Texas.
Do I Really Need to Insulate Ducts in My Attic?
Yes, without a doubt. Up in your attic, you're dealing with an unconditioned space. In our corner of Texas, that means it can easily soar above 120°F during the summer.
Imagine your AC is pumping perfectly chilled air through bare metal ducts running through that oven. That cool air warms up significantly before it ever reaches your living room. This forces your air conditioner to run longer and work harder just to keep up, which you'll definitely see on your energy bill. For our specific climate zone, the Department of Energy recommends a minimum of R-8 insulation for attic ducts to effectively stop that heat gain.
What’s the Difference Between Sealing and Insulating Ducts?
This is a fantastic question because it highlights two separate but equally vital jobs. I like to think of it this way: sealing is about stopping air leaks, while insulating is about preventing heat transfer.
Sealing: This is where you use mastic sealant or a special foil tape to close up every single gap at the joints and seams of your ductwork. It physically stops your expensive conditioned air from escaping into the attic or crawlspace.
Insulating: Once everything is sealed tight, you wrap the ducts with an insulation blanket. This step prevents the attic’s intense heat from warming up the cool air inside (in summer) and keeps your heated air from losing its warmth (in winter).
For the best results, you must always seal before you insulate. Insulating a leaky duct is like putting a winter coat on a leaky water bottle—you haven't actually fixed the real problem.
Can I Just Use Regular Duct Tape for Sealing?
Absolutely not. This is a common mistake, and despite its misleading name, standard grey "duct tape" should never be used on HVAC ducts. The adhesive just isn't made to handle the extreme temperature swings we get here in North Texas.
After just one harsh summer, that adhesive will dry out, turn brittle, and fail completely. All the leaks you worked so hard to fix will be wide open again. For a repair that actually lasts, you need to use materials specifically designed for the job, like a thick mastic sealant or a UL 181-rated foil tape.
Expert Tip: High utility bills are one sign of leaky ducts, but also watch for stuffy rooms that are hard to keep comfortable or dusty streaks around your air vents. A quick look in your attic might reveal obviously disconnected joints. For a truly accurate diagnosis, a professional can run a "duct blaster test" to measure the exact amount of leakage in your system. It's the best way to pinpoint exactly where your energy dollars are escaping.
Whether you’re building your dream home from the ground up or want to make the one you love even better, getting the details right makes all the difference. If you have more questions or want a professional to take a look at your ductwork, the team at Gemini Homes is here to provide clear, honest advice. Let's make your home as comfortable and efficient as it can be. Schedule your free consultation today!
Comments