A Homeowner's Guide to the Timeline of Construction
- scott shipp
- Nov 14, 2025
- 15 min read
So, you're thinking about building a custom home in Granbury or Weatherford. One of a homeowner's first questions is always, "How long will this actually take?" From initial design sketches to finally getting the keys, you're typically looking at a 10 to 18-month journey. This timeline covers everything: pre-construction planning, securing permits, and every last detail of the build until your North Texas home is move-in ready.
Your North Texas Home Building Journey
Jumping into a custom home build is an incredible experience, but the construction timeline can seem daunting at first. It’s a lot to wrap your head around, from picking out the perfect piece of land in Glen Rose to making final decisions on faucets and light fixtures. This guide is your roadmap, breaking down the entire process into clear, manageable phases so you’re never left wondering what comes next.
Think of building a home as a carefully choreographed dance—each step must happen in the right order for the final performance to be a success. You have to lay down the border pieces of the puzzle first (that’s your pre-construction planning) before you can start filling in the big sections (like framing and major systems) and then, finally, adding those last detailed pieces that bring the whole picture to life (the finishes).
For a deeper dive into those crucial first steps, be sure to check out our practical guide on how to build a custom home in North Texas.
A High-Level Overview
To give you a bird's-eye view of the road ahead, this infographic breaks the process down into three main stages: Pre-Construction, Construction, and the Final Phase.
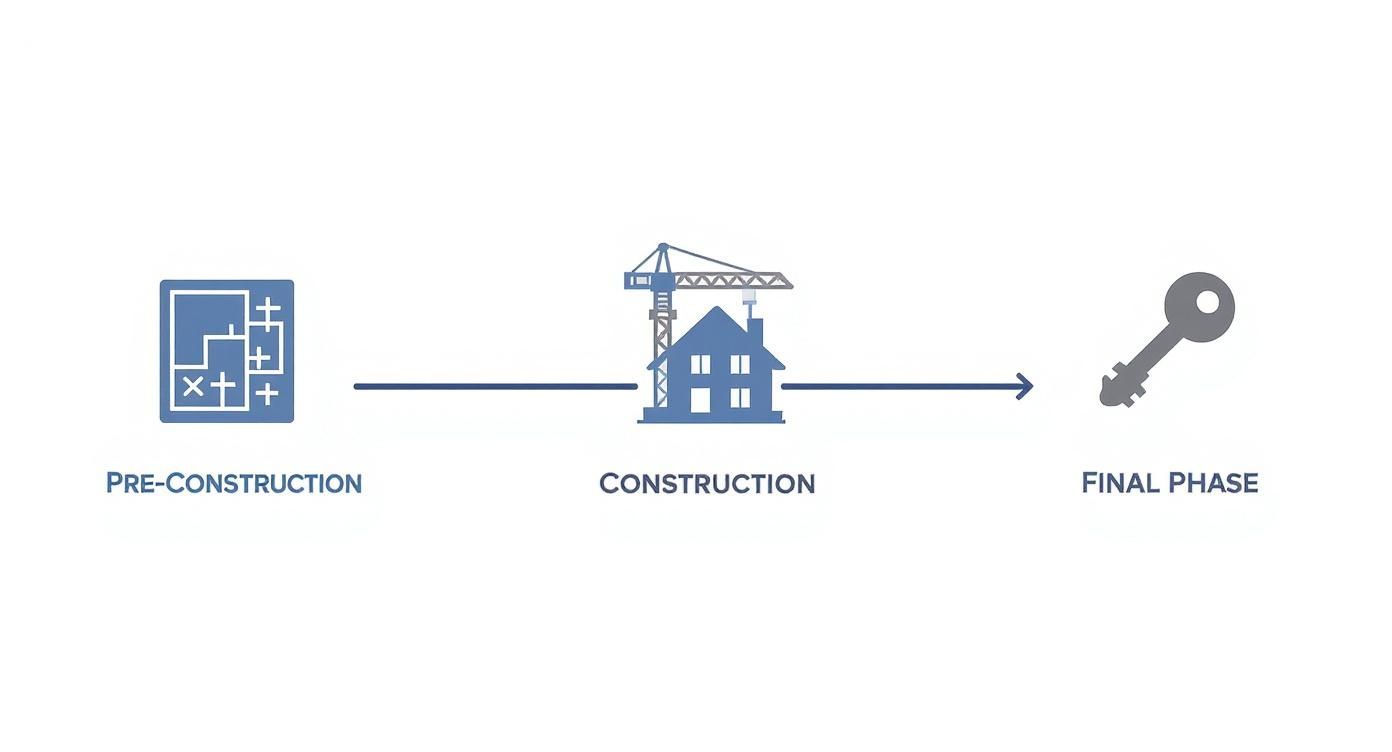
As you can see, each of these large stages is made up of many smaller, critical milestones that must be completed in sequence to keep the project on track.
This timeline isn't just a race to the finish line; it’s about doing things right. A common mistake is trying to rush through the planning phase. The truth is, investing more time in planning can significantly shorten the actual build time by heading off expensive changes and frustrating delays. For instance, a Granbury family we worked with had all their material selections locked in before we even poured the foundation. This meant we weren't stuck waiting for a unique tile or custom-ordered window to arrive months down the line.
To give you a clearer picture, here's a breakdown of the typical phases you can expect when building a custom home with us in North Texas.
Typical Phases of a North Texas Custom Home Build
Phase | Description | Typical Duration |
|---|---|---|
Pre-Construction | Architectural design, engineering, selections, and securing permits. | 3 - 6 months |
Sitework & Foundation | Clearing the land, grading, and pouring the concrete foundation. | 2 - 4 weeks |
Framing & Exterior | Building the home's skeleton, roof, windows, and siding. | 4 - 8 weeks |
MEP Rough-Ins | Installing plumbing, electrical, HVAC, and low-voltage wiring. | 2 - 4 weeks |
Drywall & Finishes | Insulation, drywall, interior paint, flooring, cabinets, and tile. | 6 - 12 weeks |
Final Details & Closeout | Fixtures, landscaping, final inspections, and the punch list. | 4 - 8 weeks |
This table provides a great overview, but remember that every project is unique. The duration of each phase can shift based on your home's complexity, weather, and other factors.
A well-defined construction timeline does more than just set a move-in date. It serves as a vital communication tool between you and your builder, ensuring everyone is aligned on expectations, progress, and key decisions from start to finish.
This structured approach is crucial, whether you're a family building on a few acres of rural land or a retiree designing your forever home in Weatherford. It allows us to carefully plan for any site-specific challenges and incorporate long-term accessibility needs right from the start. A good builder's job is to manage this complex schedule, coordinating dozens of skilled tradespeople to make sure your home is built on time, on budget, and with the craftsmanship you expect.
Laying the Groundwork: The Critical Pre-Construction Phase
Before a single shovel hits the dirt, the most crucial part of your construction timeline is already underway. This is the pre-construction phase, where your dream home goes from an idea to a detailed, buildable plan on paper.
Trust me on this: rushing through these initial steps is the single biggest mistake you can make and the fastest way to blow your budget and create frustrating delays.
Think of it like planning a big road trip. You wouldn't just jump in the car; you’d map your route, figure out where you're staying, and budget for gas and food. Building a home is no different. This is the stage where we create the architectural plans, assemble your build team, and lock in every decision before the real work begins.
Assembling Your North Texas Dream Team
Your first move is to pick the right partners. This isn't just about hiring a builder; it's about putting together a collaborative team that includes an architect or designer and your builder. Here in areas like Granbury and Aledo, you absolutely want a local builder who understands the specific challenges of our region—from our expansive clay soils to the nuances of local building codes.
A great builder should be part of the conversation from the very beginning. Their real-world knowledge is invaluable. They can look at a design and immediately suggest ways to align your vision with your budget, maybe by using a different material or a smarter construction method that achieves the same look without breaking the bank. This early collaboration saves you from the heartbreak of designing a home you can't actually afford to build.
Designing, Budgeting, and Making Selections
With your team in place, the design process takes off. This is the exciting part where you and the architect translate your vision into formal plans, moving from rough concepts to detailed construction documents.
This is also when you need to start making key decisions. Finalizing your material selections now is essential for keeping the project on schedule. This includes things like:
Exterior Finishes: Are you going with native Texas stone, classic brick, or a siding that can handle our intense summer sun? The cost difference between these can be significant, ranging from $8-$15 per square foot for brick to $25-$50 for quality stone.
Interior Fixtures: This includes everything from faucets and light fixtures to the exact style of your kitchen cabinets.
Flooring and Tile: You’ll need to decide on materials that fit your lifestyle—maybe durable tile for a home with kids and pets, or timeless hardwood for a retiree's quiet retreat.
Your ability to make timely, firm decisions during pre-construction has a direct impact on the entire timeline. The more you finalize upfront, the fewer speed bumps you’ll hit once we start building.
Navigating Permits and Financing
Once we have a solid design and a firm budget, we move on to the administrative side. Your builder will take the lead here, submitting the detailed plans to the local authorities in Hood or Parker County to get the necessary building permits. This process isn’t instant—it can take several weeks—so it’s a period we have to build into the timeline.
At the same time, you'll be wrapping up your construction loan with your lender. They'll need to see the finalized plans, the contract with your builder, and a detailed budget before they give final approval. A well-prepared builder makes this a much smoother process.
The global construction market was valued at around USD 2.15 trillion and is expected to keep growing, showing just how much demand there is for new homes and infrastructure worldwide. You can explore the full report on global construction market trends to get a sense of how our work here contributes to that massive industry.
All told, this entire pre-construction phase can take anywhere from three to six months. Every moment of it is time well spent. A meticulous plan is the best tool you have for ensuring your North Texas home is built on time, on budget, and exactly the way you imagined it.
Raising the Walls: From Foundation to Dry-In
After all the planning and paperwork, this is where your vision finally starts to take physical form. Watching months of careful planning turn into daily, visible progress is a huge thrill for every homeowner.
This phase kicks off with preparing the site. For rural properties around Granbury or Glen Rose, this often means more than just scraping off topsoil. It can involve clearing trees, grading the land to ensure water drains properly away from your future home, and digging trenches for utilities like water, septic, and electricity. This groundwork is the unsung hero of a stable, long-lasting home.
Once the site is prepped, we pour the foundation—the literal base of your entire home. Here in North Texas, choosing the right type of foundation isn't just a detail; it's one of the most critical decisions of the entire build.
Choosing the Right Foundation for North Texas Soil
Our region is famous for its expansive clay soils, which swell when wet and shrink when dry. That constant movement can wreak havoc on a foundation that isn't up to the task, leading to cracks in walls and floors years down the road.
Because of this unique challenge, a post-tensioned slab-on-grade foundation is almost always the best choice for new custom homes in this area.
Slab-on-Grade: We pour a single, solid slab of concrete directly on the prepared ground. A grid of steel cables runs through it, and after the concrete hardens, we tighten these cables, creating immense internal strength. This makes for a tougher, more crack-resistant foundation that can handle our shifting soils.
Pier-and-Beam: You'll see this older style around, where the house sits on piers with a crawl space underneath. While it has its place, it can be more prone to moisture problems and is generally less stable on the active clay soil we see in Weatherford and the surrounding communities.
For most new home builds around here, the stability and durability of a properly engineered slab-on-grade foundation give you the best long-term value and peace of mind.
Framing Your Home's Skeleton
Once the foundation has cured, the framers arrive. This is arguably the most dramatic and rewarding part of the entire process for homeowners. In what feels like just a few days, a skilled crew erects the wooden skeleton of your house—the walls, floor system, and roof structure.
Suddenly, you can walk through rooms you’ve only ever seen on a blueprint. You can stand in your future kitchen, look out of the window openings in the living room, and finally get a true sense of the scale and flow of your home. It’s a huge milestone where the abstract plan becomes a tangible reality.
This is your first real chance to walk through the layout. We always encourage clients to take a walk with us at this stage to make sure window placements and room sizes feel right before we move on.
Reaching the "Dry-In" Milestone
With the frame up, our next big goal is to get the house "dried-in." This is a critical point that protects the new structure from the elements. Once we're dried-in, interior work can begin without being at the mercy of unpredictable Texas weather. A sudden spring thunderstorm in Stephenville won't bring progress to a grinding halt.
Getting to this point involves a few key steps:
Sheathing: We cover the exterior walls and roof trusses with plywood or OSB (Oriented Strand Board), creating the home’s outer shell.
House Wrap: A special weather-resistant barrier goes over the sheathing. This keeps rainwater out but allows water vapor to escape from inside the walls.
Windows and Doors: All exterior windows and doors are installed and sealed up tight.
Roofing: The roof deck gets covered with underlayment, and then the final roofing—whether it's shingles, metal, or tile—is installed.
Once these steps are done, your home is officially protected. The interior is safe from rain, wind, and sun, giving us a controlled environment to start the next phases. This milestone, which typically takes four to eight weeks from the start of framing, marks a major leap forward in the construction timeline.
Your Home Gets Its Guts: MEP & Interior Rough-Ins
Now that your home is dried in and protected from unpredictable Texas weather, the action moves inside. Think of this stage as installing your home’s central nervous system, circulatory system, and respiratory system all at once.
We’re talking about all the essential networks that will soon be hidden behind the walls. In the industry, we call this the “MEP rough-in,” a flurry of activity where licensed tradespeople bring your home to life.
What Exactly Is an MEP Rough-In?
MEP is an industry acronym for the three main systems installed once framing is complete. It’s a carefully choreographed dance between highly skilled crews.
Mechanical: This is your HVAC system—Heating, Ventilation, and Air Conditioning. Technicians will run all the ductwork through the attic and wall cavities.
Electrical: The electricians arrive to run what looks like miles of wiring. They pull wires from the future panel box location to every single outlet, light switch, and fixture box on your blueprints.
Plumbing: Plumbers install all water supply and drain lines for every kitchen, bathroom, and laundry room, as well as gas lines for furnaces or cooktops.
A good builder manages this process with precision, making sure each trade can work efficiently without getting in another's way.
Your Last, Best Chance for Customization
Before the insulation and drywall go up, making small changes to the electrical or low-voltage layout is incredibly simple and cheap. Trying to do it later involves drywall repair, texturing, and painting.
Think about how you’ll really live in the space. We see a lot of smart, practical additions in North Texas homes, such as:
An outlet inside a pantry or closet to charge a cordless vacuum.
A floor outlet in the middle of a large living room for lamps, especially popular in a spacious Glen Rose home.
Extra garage outlets or even a dedicated 220v circuit for workshop tools for a rural property owner.
Pre-wiring for ceiling fans on your back porch to beat the Texas heat.
Think about the little details of your family's daily life. Do you need an outlet in the pantry for a coffee station? Want to mount a TV on the patio someday? Speak up now! This is the last easy chance to dial in your home’s functionality.
This is also when we run all the low-voltage wiring for Cat-6 ethernet cables, speaker wire for a whole-home audio system, and wiring for security cameras. Planning for this infrastructure now is key to future-proofing your home.
The All-Important Rough-In Inspection
After every wire, pipe, and duct is in place, everything stops for the rough-in inspection. A city or county inspector comes to the site and meticulously checks the work of every trade to ensure everything is installed safely and meets current building codes. They’ll check that wires are stapled correctly, drain lines have the proper slope, and ductwork is sealed tight. Nothing else can happen until we get that "green tag" of approval. It’s a non-negotiable quality control step that protects your investment.
Phase 5: Adding Character with Finishes
Once all the "behind-the-walls" systems are approved by inspectors, we move into the most satisfying part of the build. This is where the shell of a house finally starts to look and feel like your home.
It all begins by closing up the walls. Crews hang, tape, and mud large sheets of drywall, creating the smooth surfaces that will define every room. After a thorough sanding, the painters lay down primer and the first coats of paint, and suddenly, the space is filled with color and personality.
The Art of the Finish-Out Sequence
With the initial paint on, the job site becomes a beehive of activity. A whole new set of skilled trades—carpenters, tile setters, cabinet makers—arrive to install the high-impact details. A good builder manages this stage like an air traffic controller, because the sequence is absolutely critical to avoid damage.
The general flow for interior finishes looks something like this:
Cabinetry: Kitchen and bathroom cabinets almost always go in first.
Trim Work: Next up are the carpenters, who hang interior doors and install all the detailed trim work—window casings, baseboards, and maybe some crown molding.
Hard Surface Flooring: Now it's time for tile in the bathrooms and laundry room, followed by any hardwood or luxury vinyl plank (LVP).
Countertops: With cabinets in, fabricators can take hyper-accurate measurements to cut and install granite, quartz, or whatever material you’ve chosen.
Final Paint & Carpet: The painters come back for a final coat on the walls and to paint all that new trim. Carpet is one of the very last things to go in.
Making Smart Selections for the North Texas Lifestyle
Choosing the right materials here is about more than just what looks good online; it’s about what holds up to real life in North Texas. For families with kids and dogs in places like Aledo or Godley, luxury vinyl plank (LVP) flooring has been a game-changer. You get the gorgeous look of hardwood, but it’s waterproof, tough against scratches, and very forgiving.
Cost is obviously a huge driver. While a slab of natural marble is stunning, engineered quartz countertops often deliver better long-term value and durability for around $60-$120 per square foot installed. Quartz is non-porous, so it won’t stain from spilled wine, and you never have to seal it like you do with granite—a huge plus for any busy household.
The finishes stage is where all your early design decisions really pay off. When we have your tile, flooring, and light fixtures selected and ordered months in advance, the work just flows. There’s no waiting around for a backordered faucet to show up.
Installing the Final Details
As the main surfaces get finished, our electricians and plumbers come back for their final act. This is when the lights literally come on.
Light fixtures, ceiling fans, switches, and outlets are installed.
Sinks, faucets, toilets, and showerheads are plumbed and set.
Appliances like the range, dishwasher, and microwave are delivered and hooked up.
This whole whirlwind of activity can last anywhere from 6 to 12 weeks, and it’s all about careful coordination. It’s this meticulous management that finally transforms a construction site into a beautifully finished home.
The Final Stretch: From Punch List to Move-In Day
You're in the home stretch, where big-picture work gives way to perfecting the tiny details that make a house a home. The finish line is just ahead, and this is where a builder's commitment to quality really shows.
It all comes down to a critical step: the punch list walkthrough. This isn't just another inspection; it's a collaborative final review where you and your builder walk through every single room together, looking for any small items that need a final tweak before you take ownership.
Perfecting the Details with the Punch List
Think of the punch list as the final polish. After months of construction, there are bound to be a few minor imperfections—not major issues, but the little things that separate a good build from a great one.
Here are a few examples of typical punch list items we see on our projects in Granbury and Weatherford:
A paint scuff on a wall from when an appliance was installed.
A cabinet door that needs a quick hinge adjustment to close flush.
A "nail pop" in the drywall that needs to be smoothed over and touched up.
A small gap in a piece of trim that needs another bead of caulk.
A professional builder doesn't dread the punch list; we welcome it. This is our last chance to make sure every detail of your new home meets not just the building code, but your personal standards.
This process is a partnership. We’ll build out the list together, and our crew gets to work checking off every item. At the same time, the local building department will conduct its final inspections. Once they sign off, they issue the Certificate of Occupancy—the official green light that your home is safe and ready to live in.
From Final Grading to a Final Handshake
While our interior crews are busy with the punch list, the outside of your home is getting its final touches. The land is given its final grade to ensure water drains away from the foundation, a crucial step for any North Texas property. This is also when your driveway finally gets poured and the landscaping goes in, turning the former construction site into a real yard.
Once the punch list is done and the Certificate of Occupancy is in hand, it's time for closing. You'll sign the last of the paperwork and make the final payment. Then comes the best moment of the entire process: we hand you the keys to your new home. Our relationship doesn't end there, though. We’ll walk you through all of your home’s new systems and make sure you understand your builder's warranty, which is our promise that the craftsmanship will stand the test of time.
Common Questions About the Construction Timeline
Stepping into a custom home build is exciting, but it naturally comes with questions about the timeline. Here are straightforward answers to the questions we hear most often from our clients here in North Texas.
How Long Does a Custom Home Build Take in the Granbury Area?
Realistically, for a fully custom home in places like Granbury or Weatherford, you should plan for the entire journey—from the first sketch to getting your keys—to take somewhere between 10 and 18 months.
What causes that big range? A straightforward build on a prepped, level lot might lean closer to 10 months. On the other hand, a complex architectural design on a sprawling piece of land that needs significant clearing and grading is likely looking at 18 months or longer. The biggest factors that move the needle are architectural complexity, material availability, and, of course, the weather.
What Are the Most Common Construction Delays in North Texas?
Around here, the weather is often our biggest wildcard. The heavy spring rains we’re famous for can bring all foundation and framing work to a screeching halt, sometimes for days at a time.
Supply chain hiccups are another big one. We've seen projects held up waiting for specialty items like custom windows, roof trusses, or even high-end appliances. A seemingly small homeowner-driven change mid-build can also create a domino effect, impacting the schedule and the budget. That’s why it’s so important to have a solid builder who can anticipate these things. When you're interviewing builders, be sure to cover the top 10 questions to ask custom home builders in North Texas to see how they handle these exact scenarios.
How Can I Help Keep My Project on Schedule?
The single most important thing you can do to keep your project moving is to be decisive, especially during the planning phase.
Try to lock in all of your selections—from flooring and tile to light fixtures and paint colors—before the first shovel hits the ground. When your builder needs an answer from you, a quick response makes all the difference.
Clear communication and trusting the process your builder has established are your best tools for preventing self-inflicted delays. It is the key to a smooth and efficient build.
Getting a handle on the construction timeline is the first step toward a successful project. When you’re ready to map out the plan for your own dream home, we're here to guide you through every phase with confidence. Contact us today for a free consultation.